| |
|
|||||
| |
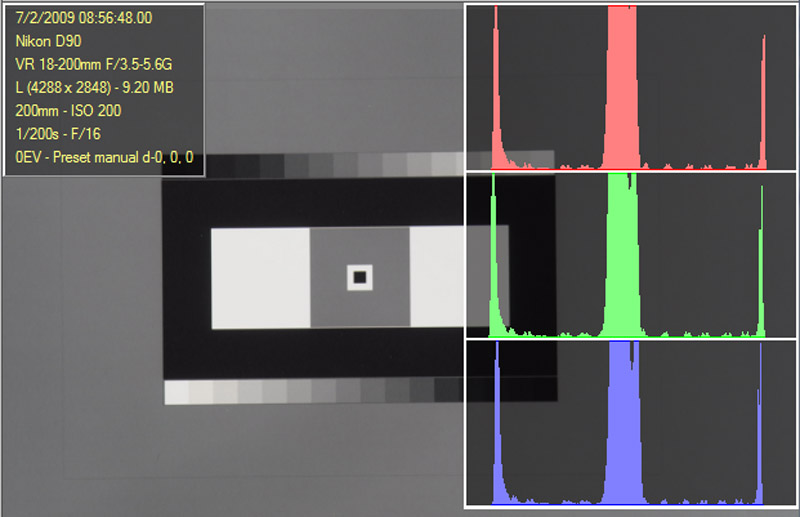
The Mystical Grey Card Grey cards used to be very carefully specified and meticulously manufactured and kept in light tight envelopes and had expiration dates because of fading with light exposure and age. They were relatively expensive and often counterfeited by people who used ordinary poster board. At one point some photographers discovered that they were not 18% grey as supposed but closer to 12% and some preferred one and some preferred the other. There were arguments of what constituted density, reflectance and it was difficult to justify all the fuss. Even the exposure meter manufactures disagreed on what to measure and how to measure. I am going to offend a lot of photographers here, but it is absolute folly to believe that a certified grey card or WhiBal chip will be useful in determining the proper exposure for a Nikon DSLR. There are too many variables in digital color photography to have anything but a general notion of establishing a starting point. Now I am going to offend the manufacturers of digital cameras. Matrix metering is broke, center weighted metering is not much better and spot metering is subject to misunderstandings and math errors. That ought to do it. Let’s start with the myth of matrix metering. It does not make an 18% calculation of the whole picture. Nobody knows just how it works on a model by model basis. We have learned that the center or focus point of the image has a greater influence. It does not consider overexposure at the critical white point. It does not consider the particular colors or non standard mix of colors. Even though Nikon claims a database of thousands of historical pictures are used to evaluate the exposure, there is not one clue as to which historical photograph influenced any particular exposure. The fundamental ingredient of a good photograph is a properly exposed raw file. The next step is conversion to camera settings which makes it half baked. Post processing completes the product. My personal goal is to make an acceptable half baked image directly out of the camera as often as I can. White balance and proper exposure are very closely related in digital photography. The next image should wake you up. It is an image from the camera monitor that shows perfect color balance and exposure at a single glance. This is unique. I have never seen this before and only recently discovered the principle. It requires no special purchase or expenditure and will cause you to be able to wrap your head around white balance and exposure at the same time.
Unfortunately
it
requires a camera with RGB histogram display, but you can begin to
utilize the
principles involved with any other camera by using the raw converter or
photo
editor you already have. This image could have been with a D70, D100 or
D50
which does not have a color histogram. It was made at the classic Sunny
16 exposure where ISO = Shutter speed. It shows the result of custom
white balance made according to instructions for that particular camera
and requires only a few seconds to execute. As soon as the meter
returned to normal an exposure was made. Whatever the variables were
for the custom white balance, they can be used again by using the
actual picture in the camera to retrieve the values. Nikon View will
allow you to fine tune the white balance by setting the K value of the
white balance. Note the perfect alignment of the white values on the
right of the histogram. The 16 step gradient also gives tic marks to
allow you to understand how linear the histogram is. In this case, it
is pretty linear, but on the camera you will note a lot of compression
at either end and a big spread in the middle. Limiting the spread to
avoid the last 1/8 at the extremities is conservative considering
this is a flat target. Real
life is three dimensional. Imagine this target wrapped around a
cylinder. The cylinder will have a shadow side which is two or three
stops lower in value. The exposure is computed around the center value
of this new scene with greater range. This increases the dynamic range
enough to push the black and white ends of the histogram off scale. There
is a popular complaint that matrix metering will blow highlights.
Matrix metering doesn't blow highlights, it is the high dynamic range
of the scenery that blows the highlights. The best cure for high
contrast scenery is to set the camera contrast to low or use a form of
Adaptive Dynamic Lighting. ADL
actually is designed around the shadow/highlight type scene. It splits
the image into 2 or three major zones represented as shadow, fully lit
and secondary light source (sky). ADL is highly secretive and never
explained properly, but you can see how it works. It appears that low,
medium, high and extra high are not degrees of adjustment but
distinctly
different in the way they divide the tone spectrum and deal with the
black and white points. Low will actually try to nail the end points
and may either increase or decrease the contrast in the overall
exposure curve. I suggest we all experiment with ADL to discover how it
helps us. Notice that the white spike is at the 7/8th position on the histogram. Any increase in exposure will compress the histogram showing a possible color shift could occur at that point. I choose not to be tempted to utilize that part of the spectrum because the risk is not worth it to me. Let’s review what we have learned so far. Uniform grey patches produce narrow spikes on a histogram. The grey value of the patch controls where on the horizontal scale it will appear. White makes a spike just like grey or black. The histogram and associated values are a non linear progression. You can detect distortion by the spacing. You can see the result of contrast changes in the Picture Controls (camera settings) One uniformly grey object in a typical scene will leave a spike that can be used to correct white balance errors in post processing. What works
for checking and setting white balance? A typical sidewalk or roadbed is always available and works well. A single sheet of white paper will do the job. Keep a few 3x5 white cards in your camera kit. A white piece of paper with a strip of black electrical tape will show you the range of exposure. If you have one in the sun and one in the shade, you will appreciate the need for low contrast or ADL to capture the entire scene. Expodisk, 52 to 82 mm, one for each lens size, about $100 ea. Some people love the convenience. Cost and accuracy is a negative for me. Since the Expodisk blocks all but 18% of the light it would seem logical to me that it should face the light source, not the target image. I am surprised it is not shaped like a dome which is used on an incident light meter. Hmm.. maybe it is shaped like a lot of little domes, huh? WhiBal uses PVC colored sheets, colored in the batch, so naturally consistent and tough to resist damage to abrasion and harsh light. Most of the value is in packaging and instructions. Certification is for consistency of neutral color and not to a percentage of reflectivity, so not a good grey card. Cost for different kits is $25 to $100. The raw materials for WhiBal are available in dark grey at sign stores as a product called Komatex. Basic cost to dealer is under $1 per square foot. Free color chip samples are available from the sign supply manufacturer by phone. Scraps from the sign shop may be free to nominal depending on your smile. Mine were free. I also got the sample chip kit from the manufacturer with a phone call. Besides making decisions on how to set the camera, what else can you do? First, Even if you don’t have a color histogram in your camera, shoot a white sheet of paper that fills the viewfinder in some auto exposure mode. It will turn the white sheet into a grey tone that you can more easily see whether it is either too amber or too blue. If it is too white on the display screen you will not be able to judge color very well. Under exposing the white sheet is more telling about color. Use one of the camera pre-sets for white balance. Incandescent will be closer to correct than Auto White balance. White balance will sometimes work if your eyes tell you there is not a preponderance of any specific color in the image. Remember, eyes to SEE. You can use white balance targets with flash, but my experience shows you may be better off using the pre set flash white balance. I have deliberately uses flash WB for days that were sunny to partly cloudy since it was close enough and I needed to mask the skies for cloud emphasis anyway. Even if you don’t set the white balance before you shoot, you still have a chance to save the whole shooting sequence if you have shown a white sheet of paper or grey card in only one picture of the sequence, even the last one. Most software raw processors will allow you to set the white balance by pointing to the card. You may then apply the same white balance to the entire shooting sequence.
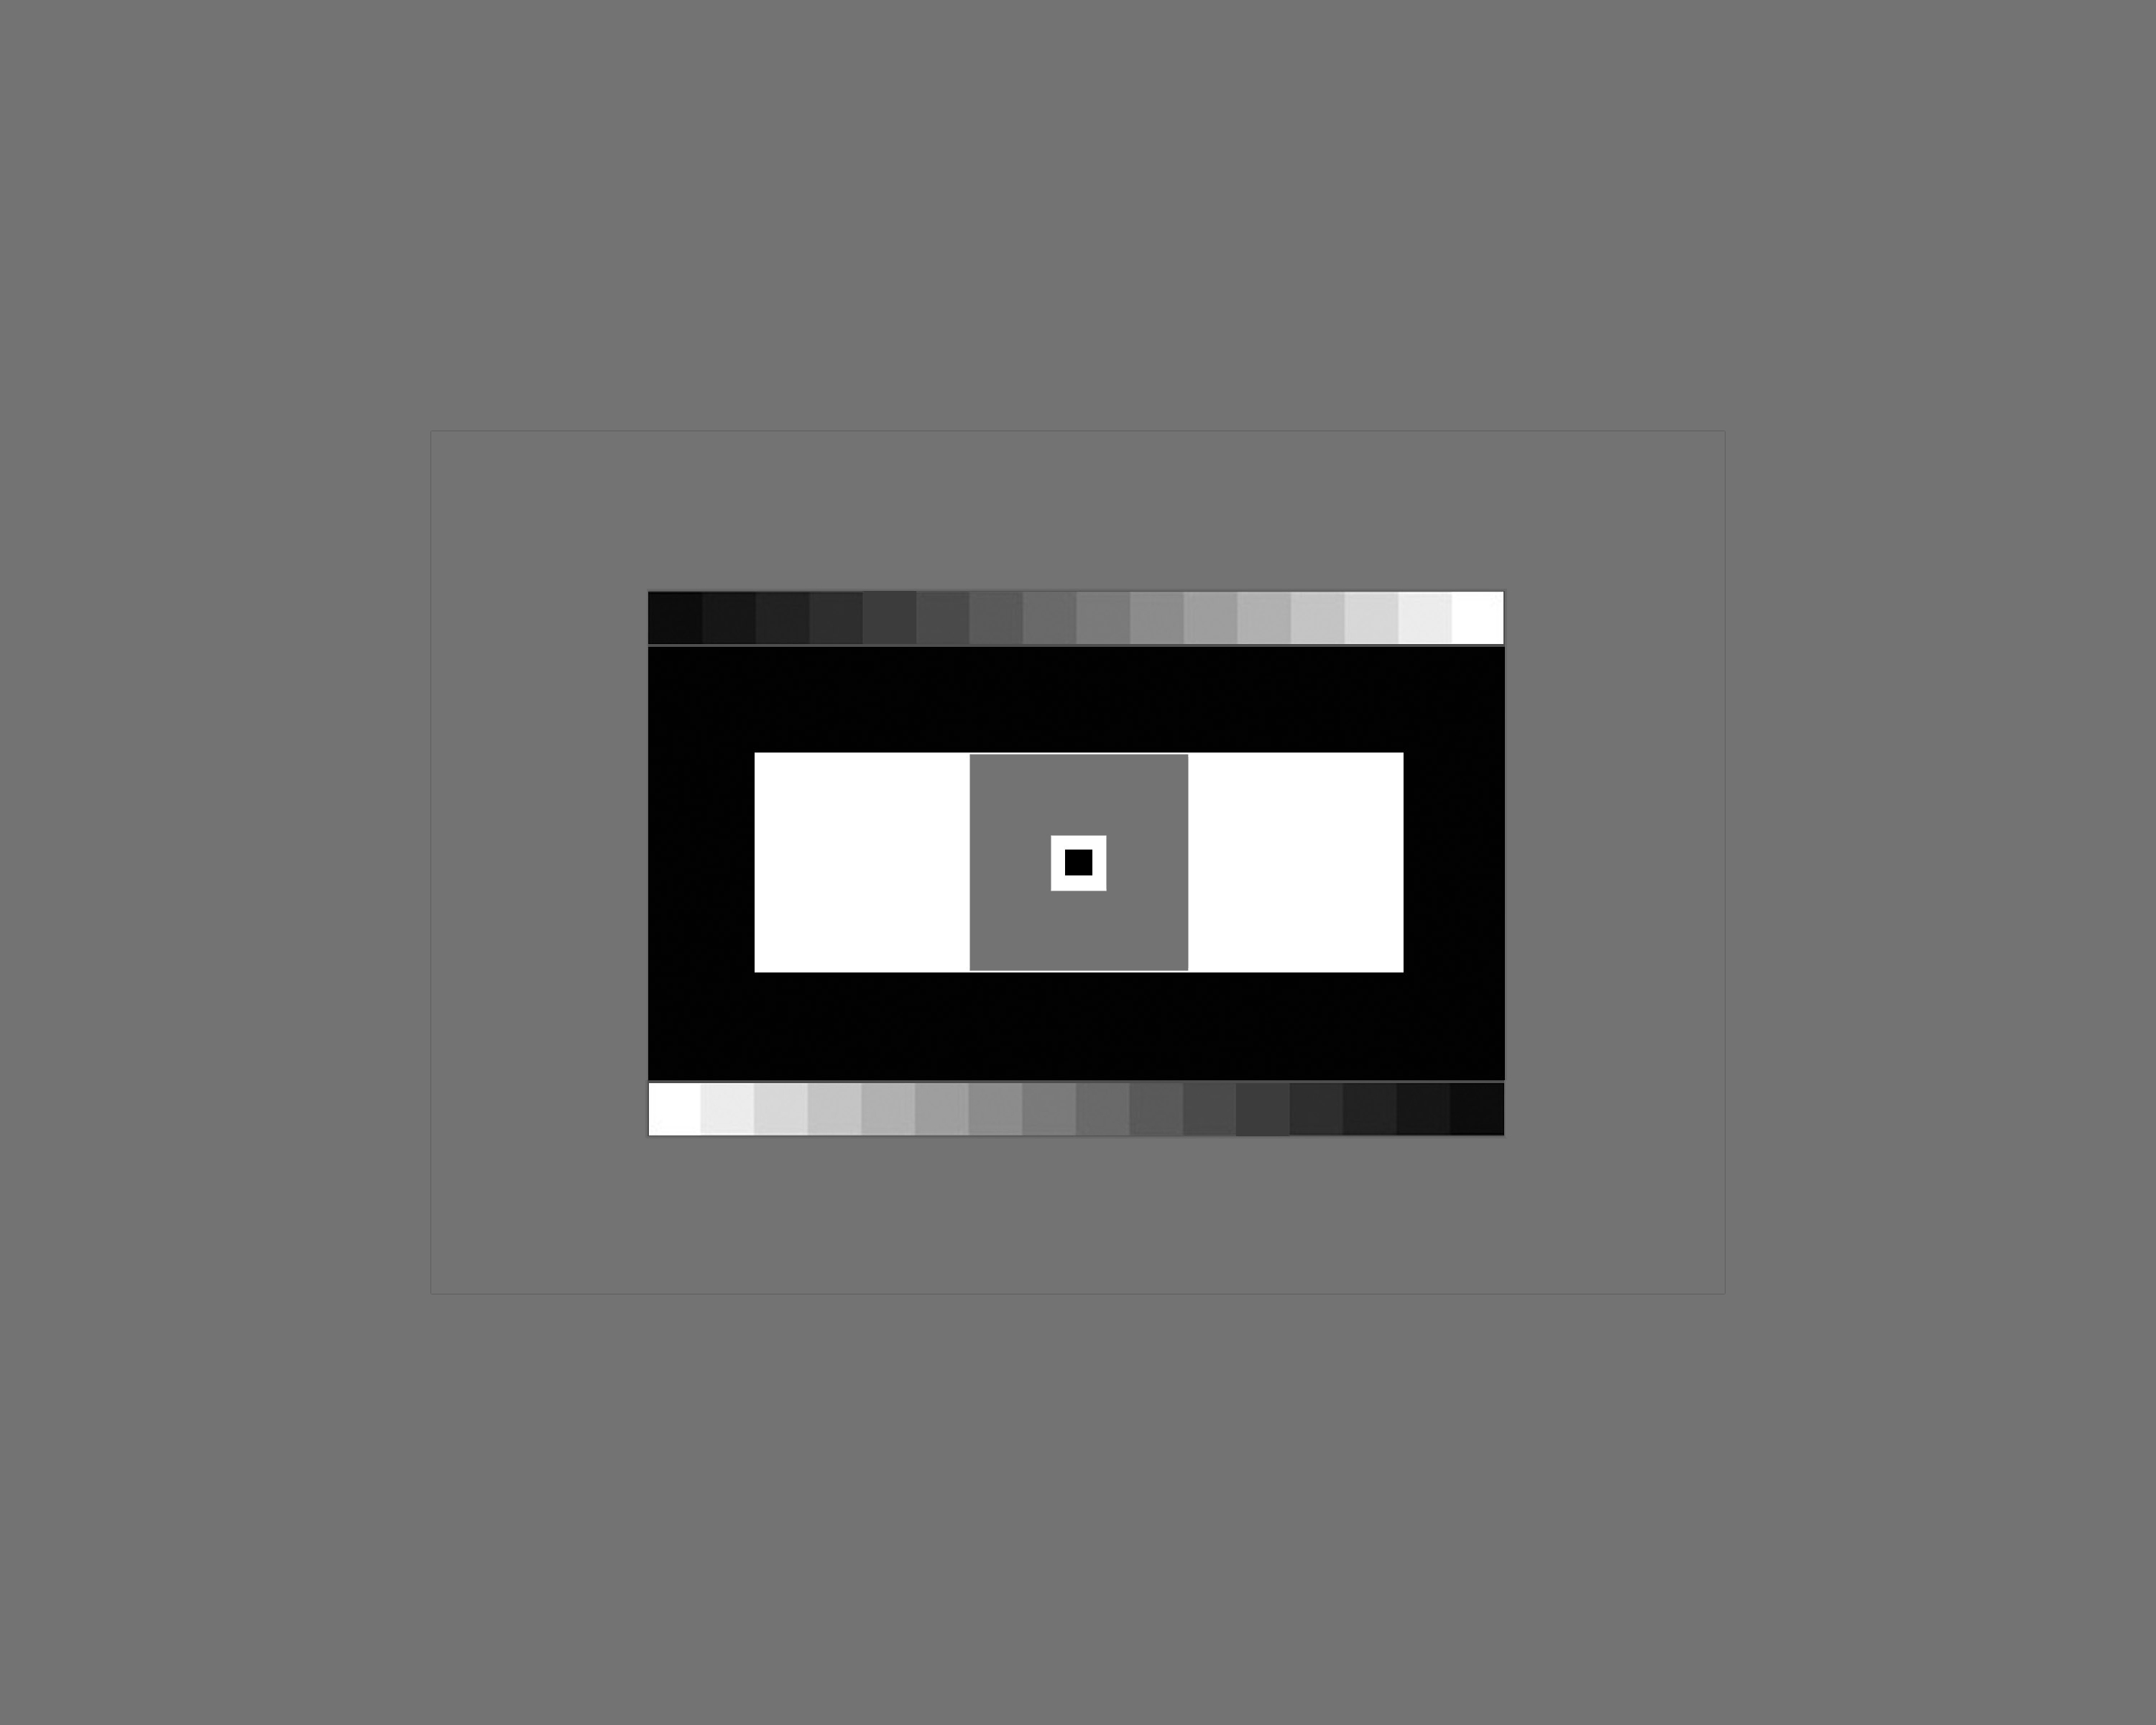
Hints on using test cards. Avoid reflections from the surface of the target. These are spectral highlights and are either too bright or reflect the color of the light from reflecting light sources. A patch of shiny cellophane tape can remind you when it reflects. The convenient thing for me to do was to throw the target on the ground. I was measuring the blue sky above me and not the light coming from surrounding trees or haze from low in the sky. If your subject is vertical like a person or building, then your target should be vertical to measure the same light falling on your subject. (remember, eyes to SEE) Consider making duplicates of your targets on Avery labels and just stick them on what you are photographing and then discard them. If the angle to the sun changes, your white balance and exposure may change. You can shoot against the sun, but just be aware of how it affects your subject and the possible glare on the lens. I use a lens hood always, not only to prevent glare, but to protect the lens from things that bump. There is still a belief that a uniformly grey card that is about two stops down from white is useful to set white balance in a digital camera. A white sheet of paper works just as well but there are some interesting things that a number of uniformly grey flat targets can help us with. The black electrical tape on white paper and the 16 step target tell you a lot about the dynamic range of your subject. Download
your test
target by clicking the target below. File is a zipped, greyscale, JPG
image at
10 inches by 8 inches at 300 dpi. It should be printed on matte or
lustre paper as a black and white image. Noritsu 3xxx printers at
Costco could be used with good results along with instructions to the
printer operator to turn "Automatic OFF". Check the finished product
for ability to resolve the 16 steps and have no hint of color cast. Do
not attempt to clip this target from your browser as the browser may
apply color profiling which will change the values.
 Chapters: 1 How
white balance works, Eyes to See © Leon Goodman 2009 |
|