|
Does
your
camera have a focus
problem?
This
Web
site has several parts
Part
1: Is there something wrong with my camera?
Part
2: My camera is OK. Is there something wrong with my technique?
Part
3: My camera needs adjusting. Can I do it myself?
Part
4: Frequently asked questions and What if?
Part 5: Advanced
focus and lens analysis
Part 5: Advanced Focus and lens analysis
Chances are, if you have not
adjusted the rear mirror stop your camera is properly focused, but you
already know that some things are not right. Phil Askey the owner of
dpreview, has stated that the backfocus problem is overblown and I have
come to agree with him to a certain degree. Autofocus as designed
by Nikon was meant to be done by a computer in the factory using a test
bench and the mirror stops are arbitrarily set to mid positions and can
be used for field adjustments. The two methods interact. If a camera
has been manually adjusted and goes back for repairs and one of the
repairs is to adjust autofocus, it will not be adjusted at the mirror
but in the computer.
How does this work? First you have to know that DSLR cameras use
phase based focus and not contrast based focus like the
point and shoot consumer cameras. Phase based focus samples part of the
image from opposite sides of the lens and matches them up on a
narrow image sensor until the two images come into convergence. The
actual adjustment made in the factory is a number that corresponds to
the distance on the
sensor from one image to the other. The advantage is that the sensor
can tell immediately whether to focus in or out and approximately how
far it has to go. The process is continuous and is repeated very
rapidly until there is no error voltage generated. The most appropriate
thing to focus on is a small black dot on a white field in bright
light. Point and shoot cameras, however work best on many edges and
transitions to develop their focus signal and they have no idea which
direction to go, so they have to try and see if the contrast improves.
To learn more about this phase adjusting process see this link.
Nikon
Auto
Focus System
The Multi CAMxxx series of modules are used on most D class cameras and
vary in the number of sensors and the method of grouping and selecting
the sensors. Some cameras may be able to use lens data that comes from
the computer chip in the lens to modify the way the sensor adjusts the
focus forward or backward and use other information about image
crossover distance and anastigmat characteristics. The details of this
interaction is considered proprietary, so any guess I make as to how it
works is simply that, my guess. I will start the guess by saying that
the target I publish for this document will work on most D class of
camera and lens. Materials were generated for the D70, but with
modifications of instructions should work with them all.
Anastigmat lenses
An optical system,
with
at least three elements, which is completely corrected for spherical
aberration, coma,
and astigmatism.
Most of the inexpensive
and kit lenses are not anastigmat. This characteristic is available in
more expensive lenses. Many inexpensive lenses have a variety of
astigmatism. The lens may not have a flat focus field. Using a tilted
target may have increased backfocus the further off axis it is
measured. The typical tilted target may have its indicator lines
several inches to the left and right of center. All non anastigmat
lenses
will indicate backfocus under these circumstances.
A lens may have cylinder astigmatism which means that vertical and
horizontal lines do not focus in the same plane. Vertical lines may
have
more backfocus than horizontal lines.
High quality prime lenses will generally focus very easily. Zoom lenses
may demonstrate various astigmatisms at different focal lengths if the
zoom lens rotates as it is zooming such as the 18-70 kit lens. The
28-200 lens, however has a flat focus field and does not rotate,
therefore does not exhibit different focus errors while zooming.
Extra design effort goes into zoom lenses that start at a wide angle.
These lenses must have special designs to avoid barrel and pincushion
distortion and therefor must sacrifice in the non obvious areas such as
focus plane in order to be acceptable to the average user.
This target is 8 by 10
inches. It may be printed on an ink jet or laser printer on
glossy paper having a printer resolution of 300dpi native resolution.
Two targets are available. One target is 300 dpi as a bilevel
compressed TIF. The other is 600 dpi which can be printed on a laser
printer. I have used card stock and photo paper with good results.
Unzip the file and open it with Photoshop or any other editor for TIF
files. Make sure the Mode is Bitmap. Do not save it in any other
format. If you have a PostScript print driver for your printer, use it
or your printer may try to change the image to a screened gray scale
image which will ruin its crisp black and white format. Set the print
driver to print in landscape. (horizontal format)
Download 300 dpi target 286
KB
Download 600 dpi target 768
KB
Preparing
to
photograph the
target.
You
can interpret this target with your naked eye, but it is much easier if
you use the histogram feature in PhotoShop Elements 3 to 5. It
has a feature called Standard Deviation which can indicate the
sharpness of the target area to three digits of accuracy. This feature
is not available on any other version of PhotoShop. More on that
later.
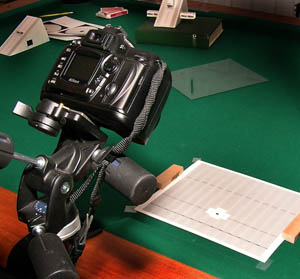
Use a
tripod not only to prevent motion but because you want to set up the
target to coincide with the markings in the viewfinder. You do not want
the target to be twisted if you are going to be making precision
observations. You should be using high quality daylight or diffused
flash for exposure. If using flash, set the shutter speed to the
highest permitted for flash. Set the camera to Manual. Set the flash to
TTL. Set the aperture to f4 or the closest to f4 you can get if you
have one of the kit lenses. Take your first shots at 50 mm focal length.
 Setting
at
F4 would be
adequate even for a lens that opens wider. We are just going to find
the sweet spot and see how close it comes to being OK. Set Manual or
Aperture
priority and make sure you are using
the central focus sensor only. Set the focus lock to "L". (seen on the
right) The
target is designed to be used at 50 to 100 mm focal length and at about
1 to 2 feet. Use
indirect or diffused daylight from a window if you can. If sunlight is
not available consider using flash. Setting
at
F4 would be
adequate even for a lens that opens wider. We are just going to find
the sweet spot and see how close it comes to being OK. Set Manual or
Aperture
priority and make sure you are using
the central focus sensor only. Set the focus lock to "L". (seen on the
right) The
target is designed to be used at 50 to 100 mm focal length and at about
1 to 2 feet. Use
indirect or diffused daylight from a window if you can. If sunlight is
not available consider using flash.
Your
target is going to lay flat on a table and you are going to position
the camera at a 45 degree angle +/- 15 degrees. Don’t get crazy about
this. It is approximate and this is an easy test. If the target curls,
consider using tape or a weight to hold it very flat. Watch out for
refections if using glossy paper for the target.
|
|
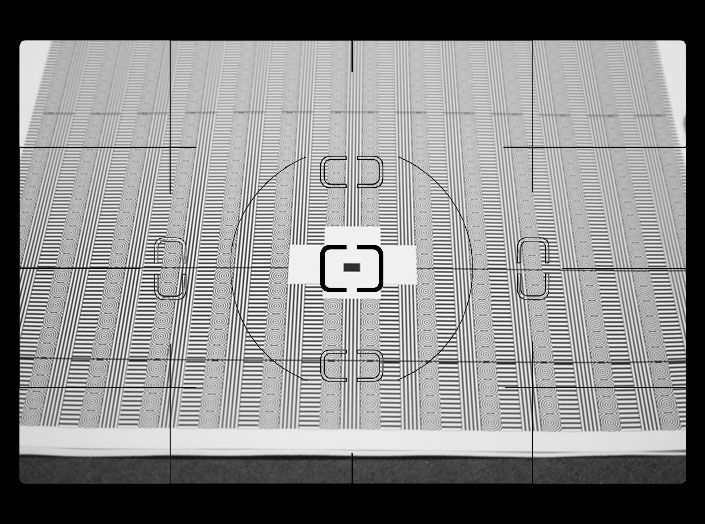
Try
to shoot with the center vertical line aligned with the camera vertical
line and the horizontal camera line perfectly lined up the horizontal
target line. The ends of the dark line on the target should
coincide
with the circle in the viewfinder. You should be clipping the left and
right edges of the target in the viewfinder.
Take
a shot or two to observe proper exposure. The whites should be white
and the line patterns should not be blown out. If there are light
reflections or
shadows on the target, move things around until you get a clear, well
exposed shot over the whole image area.
Take some time now to map the sensor position so you know where it
really is. Try to move the focus dot around in the focus rectangle and
see where the sensor is. You should not be able to achieve focus when
the black target spot is in the corners. Move the dot down from each
top corner to see when the camera grabs focus. Move the dot up from the
bottom corners to see when the camera will focus. Establish a mental
image of where the sensor sees the black dot. The examples below
use the red cross to identify the invisible sensor.
  
Move the sensor from
left
to right from the corners to see the vertical cross bar.
  
While focused
on the horizontal bar, scan left and right to ascertain the location of
the end points.
  
Continue to map the lower dimensions.
  
And lastly, confirm the end points.
At this point you know where the sensor is pointing. Take a shot and
bring it to your computer and note the pixel position of the center of
the dot. Display the info pallete to note the x,y positions, change it
to percent and note the address of the dot on the image. My camera
indicates x=50% and y=50%. Your mileage may vary. Plus or minus 1%
should not be a problem. Remember this number when you do busy field
focus checks so you can locate the position of your sensor when
evaluating focus. Busy field focus checks are for using brick walls and
newspapers as focus targets. They are more like the real world but are
not always consistent.
Evaluating what you see.
That first shot you took of the focus target will look something like
this.
The concentric circles that line up with the focus dot and the
horizontal guide line should be reasonably sharp the the image will be
out of focus above and below that point. At f4 the circles immediately
above and below the focus dot should show about the same degradation,
but still be acceptable.
You can actually measure and assign a value to the sharpness of the
image by using a statistical analysis called "standard deviation". This
feature is useful for measuring noise or sharpness associated with
contrast. The higher the number, the sharper the image. We have not
discussed exposure, but it would be best if the white was not maximum
white, but about the value of 200 measured by mousing over the area and
observing the values in the info pallete. Black should not be zero but
about 20 for best results. I use a custom P&S curve. You may need
to adjust the contrast to get those values.
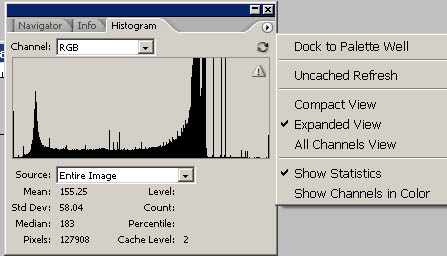
Standard deviation is available on Photoshop Elements by default, but
Photoshop CS and above Require that you invoke some preferences to see
the analysis. In the upper right corner of the histogram pallete is a
small tab with a right arrow. Click on the arrow and a flyout window
displays some options. Click Expanded View and Show Statistics.
Photoshop will remember these options from here on out.
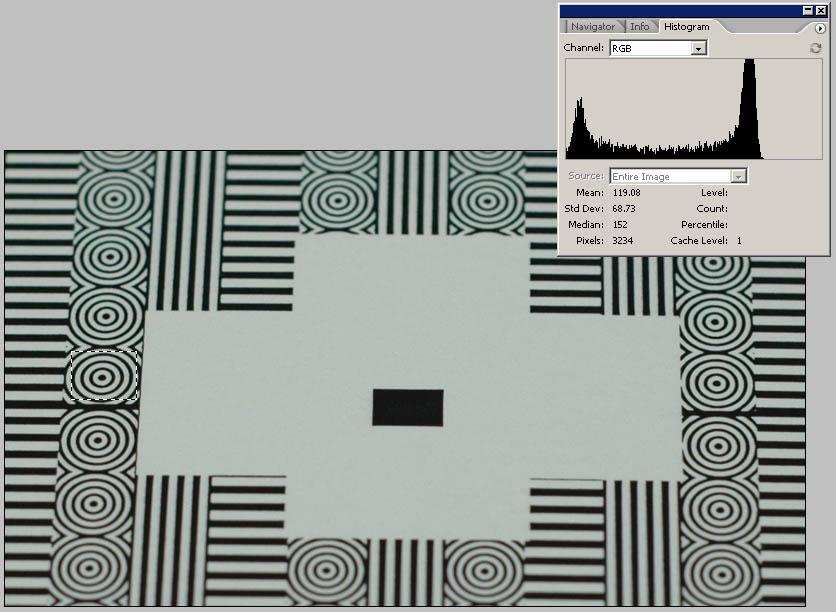
 Unlike the Levels histogram which
locks out image modification, the Histogram pallete remains active
while doing other operations such as selecting portions of the image
and marking the image. Although the source indicates Entire Image, the
histogram only displays the selected portion of the image. This allows
you to make a circle or square selection of the different patterns of
the target to compare relative sharpness. Low values are poor and high
values are better. Unlike the Levels histogram which
locks out image modification, the Histogram pallete remains active
while doing other operations such as selecting portions of the image
and marking the image. Although the source indicates Entire Image, the
histogram only displays the selected portion of the image. This allows
you to make a circle or square selection of the different patterns of
the target to compare relative sharpness. Low values are poor and high
values are better.
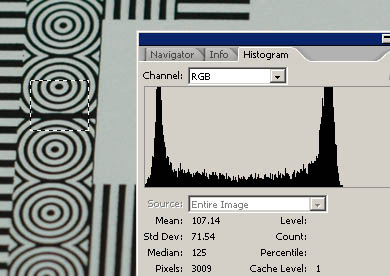 This image has a rectangle selected
for the circle to the left of the image. The Std Dev indicates 71.54.
The top circle may measure 65 indicating less sharpness. Another
important thing to notice is the shape of the histogram. There are two
distinct spikes, one indicating black values on the left and the other
indicating white values on the right. The middle of the histogram
indicates the values at the edge of the lines, the values that are not
the line or the space between the lines. The distance between the
spikes show the contrast of the image. If you use an editor that does
not have Standard Deviation, you could look at a selection of a
histogram and get a good idea of the focus. This image has a rectangle selected
for the circle to the left of the image. The Std Dev indicates 71.54.
The top circle may measure 65 indicating less sharpness. Another
important thing to notice is the shape of the histogram. There are two
distinct spikes, one indicating black values on the left and the other
indicating white values on the right. The middle of the histogram
indicates the values at the edge of the lines, the values that are not
the line or the space between the lines. The distance between the
spikes show the contrast of the image. If you use an editor that does
not have Standard Deviation, you could look at a selection of a
histogram and get a good idea of the focus.
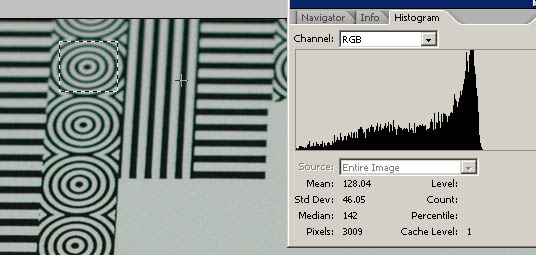 This image shows an
out of focus condition. The spike representing black is not there. What
is happening here? Remember that we are working with positive images in
digital photography. We are literally painting with light. If the image
is out of focus the light is being scattered and it therfore goes to
the black areas to reduce the blackness. It is light polution. This is
the same target as above but the circle selected is further from the
focus line. You no longer have to make a value judgement using your
tired eyes. Out of focus now has a number. In this case it is 46.08.
Even if you don't have Photoshop, you can interpret this chart with a
histogram. This image shows an
out of focus condition. The spike representing black is not there. What
is happening here? Remember that we are working with positive images in
digital photography. We are literally painting with light. If the image
is out of focus the light is being scattered and it therfore goes to
the black areas to reduce the blackness. It is light polution. This is
the same target as above but the circle selected is further from the
focus line. You no longer have to make a value judgement using your
tired eyes. Out of focus now has a number. In this case it is 46.08.
Even if you don't have Photoshop, you can interpret this chart with a
histogram.
What about the other patterns on
the target? What are these for?
Many people have believed thier camara was defective or had faulty
focus when it was the focus test or their technique that failed them.
Some lenses have undesirable characteristics that are caused by lens
defects such as astigmatism and curveture of field. In order to detect
these and other defects a variety of target elements have to be used.
We have simplified the focus point ambiguity by using a simple square
dot that will present only one large target to match on the phase
detector focus module. The circles represent a combination of all
angles of lines. Analyzing the circles should give you a
reasonable focus measurement. The veritical and horizontal lines are
used to detect astigmatism which could be an any angle depending on the
angle of the focus lens, the zoom assembly or the barrel/pincushion
elements of the lens. If the vertical and horizontal lines seem
to focus at different distances, then you might have astigmatism. The
most common correctable astigmatism is called "cylinder". If your eye
has this defect you will not get the best results from drugstore reader
glasses, but will require a prescription using a lens with some
cylinder component to correct your eye. The distance off axis from the
center is proportional to the error, so it is important to compare the
focus quality near the center and also off at the side. Many of the
targets, including my own previous target have failed to consider these
conditions and have placed horizontal lines off to the side of a target
tilted back and consequently caused people to believe they had a camera
fault that needed correction.
Let us look at a problem situation.
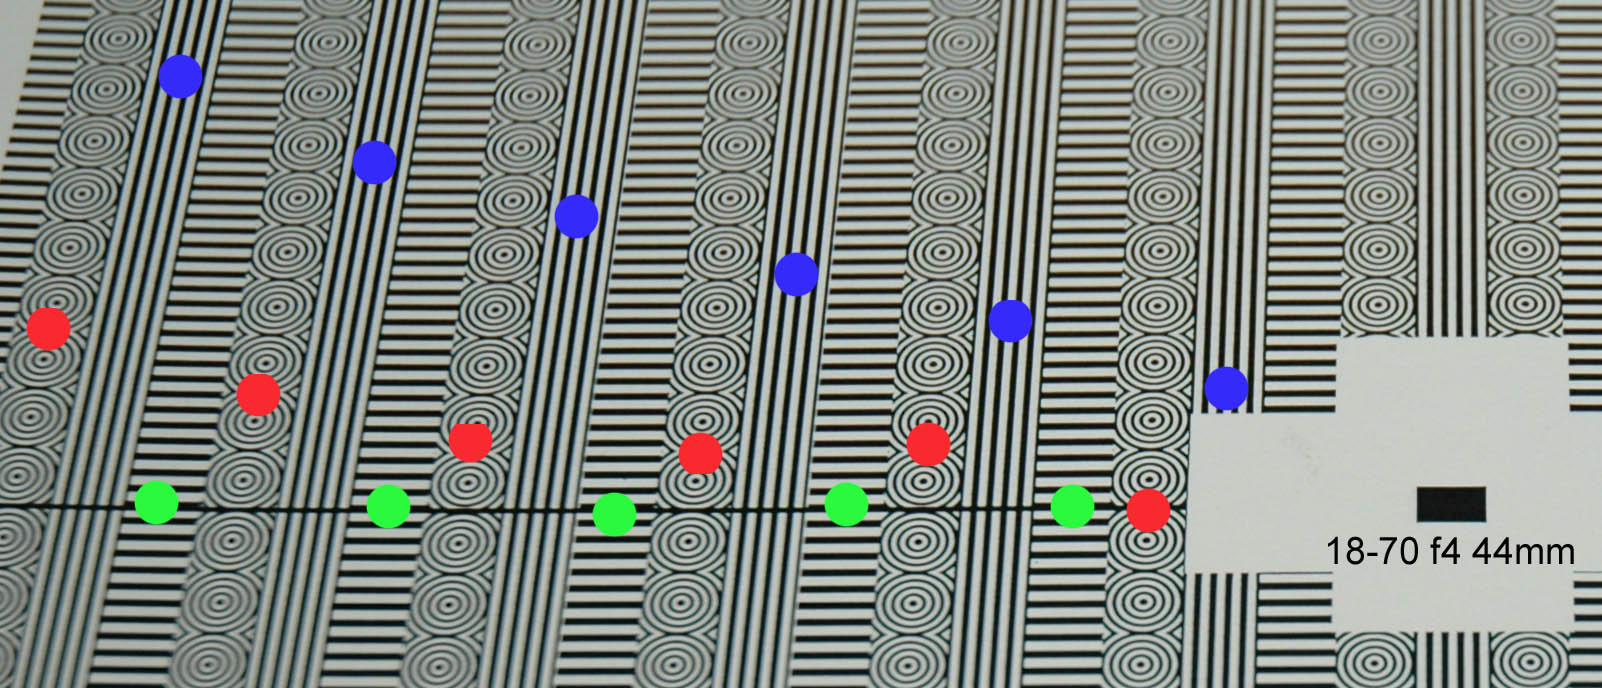
The green dots indicate the point of sharpest focus for horizontal
lines. The red dots show the sharpest focus for circular lines. The
blue dots show the sharpest focus for almost vertical lines. This is
the left side of the target. The right side is identical to this. This
is the most popular lens sold with the D70. It is no wonder that there
was a hysteria about back focus. This particular lens does not rotate
the zoom assembly at different zoom ratios and the focus lens is in the
rear, near the camera body. Other Nikon lenses like the 28-200 D rotate
the zoom assembly and the focus lens is up front.
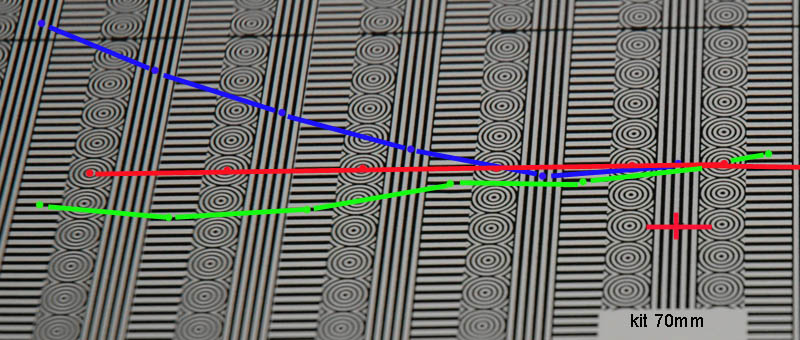
The following image was taken at 70mm with the 18-70 kit lens. The busy
field focus was used and the focus sensor has been drawn in for
reference. There is a decided backfocus with this lens, but the
horizontal line focus actually moved closer to the focus point near the
edge of the image. This would have looked OK as far as the horizontal
line sharpness on the Tim Jackson target but you would not have been
able to accept the center image at "FOCUS HERE" on his target. In all
fairness my own previously published target would have done the same
thing.
One or more lenses in a product may have slight astigmatism. When you
stack lenses in an assembly they may be at any angle and add or
subtract over a 90 degree range of rotation. My particular kit lens did
not seem to be a problem with the typical 45 degree tilt target on
horizontal lines. Somebody else having a different rotation of the
lenses may have had a severe backfocus problem. It is not clear in my
mind whether these situations are manuacturing defects or design errors.
 The astigmatism
causing this problem appears to be cylinder, however the upper right
side of the image shows a different axis. In this extreme blowup of the
circles target taken from the upper left part of the image the circle
appears OK at 4 oclock and 10 oclock and very bad at 1 oclock and 7
oclock. This distortion seems to relate with lens correction to correct
linearity (change barrel to pincushion) for the wide angle lens. The astigmatism
causing this problem appears to be cylinder, however the upper right
side of the image shows a different axis. In this extreme blowup of the
circles target taken from the upper left part of the image the circle
appears OK at 4 oclock and 10 oclock and very bad at 1 oclock and 7
oclock. This distortion seems to relate with lens correction to correct
linearity (change barrel to pincushion) for the wide angle lens.
Here is another lens, the Nikon 28-200 DX. This lens rotates the zoom
assembly so it may show different problems depending on zoom.

This is the full width busy field focus test and shows a slight front
focus near the center but a decided back focus of vertical lines near
the edges.
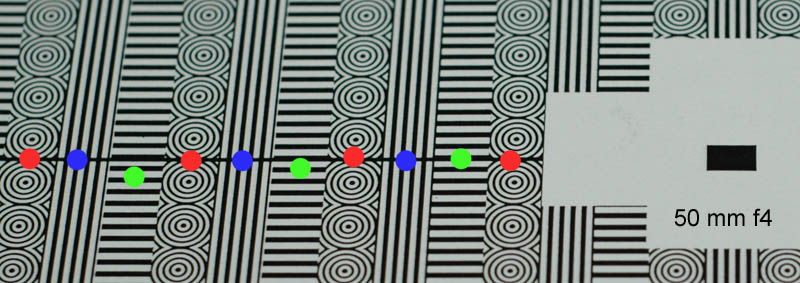
This is the Nikon 50mm f1.8 lens at f4. It is sharp, clear and high
quality all along the flat focus plane. Next image is wide open.
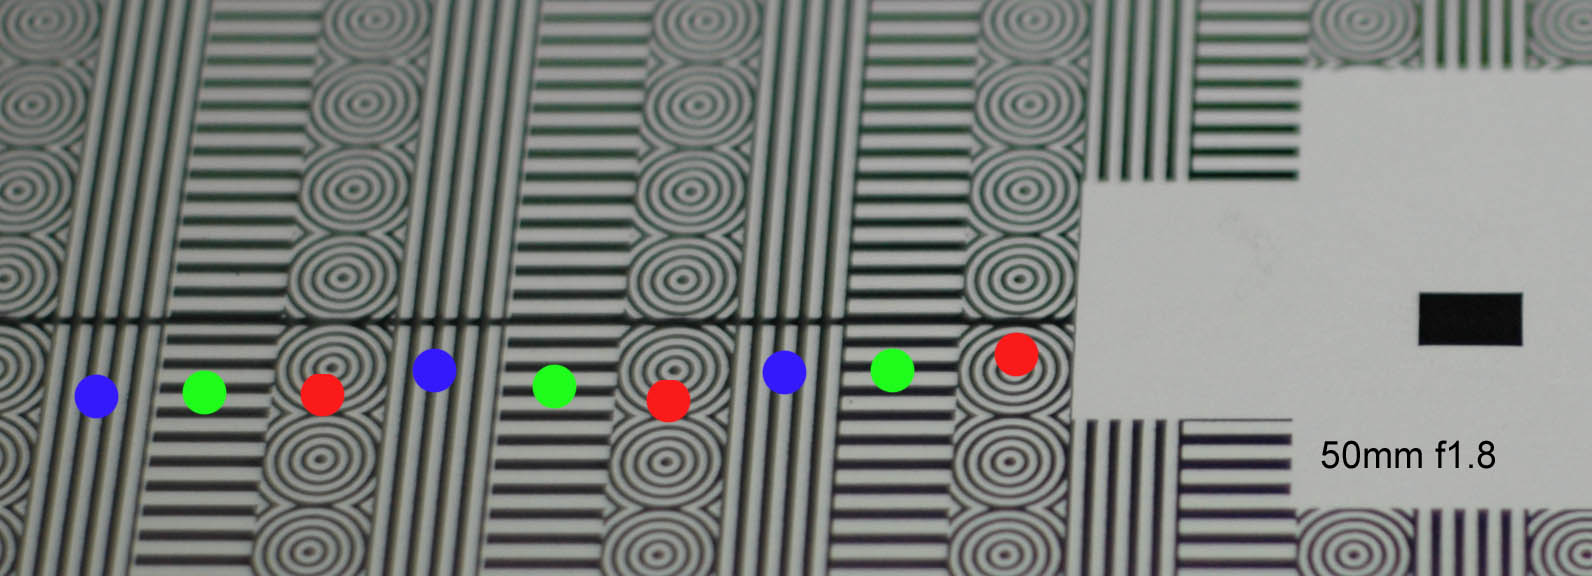
At f1.8 the image suffers from lack of contrast due to light scatter
and a predictable shift in focus caused by using an aperture area
over
four times larger than the f4 image.
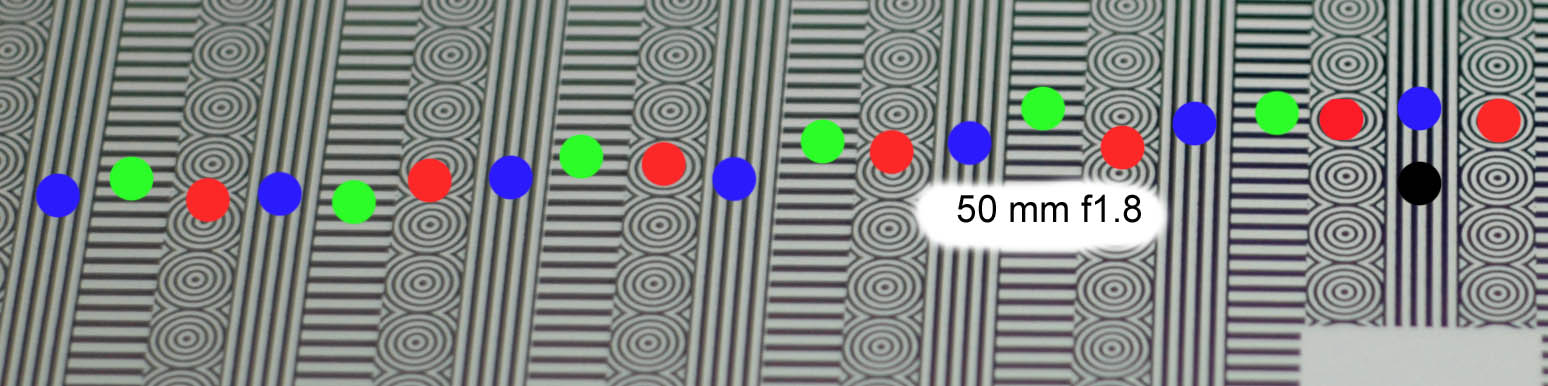
The black dot is the computed center of the focus sensor. This busy
field shot shows a little backfocus in the center and a gradual shift
to being on focus nearer the edges. This is a demonstration of the
curveture of focus field common in inexpensive glass.
As a general rule, astigmatism is more common in zoom lenses, not
primes. The more expensive the glass, the better the performance.
Really wide open lenses lose contrast due to light scatter and may
shift focus when stopped down.
In Peter Inova’s book on
the D70 and Digital photography he debunks
some myths and explains things that are commonly misunderstood. I
cannot quote because of copyright, but as he explains some of the
properties of hyper focal settings he suggests that the rule of thumb
of
1/3 of the image before and 2/3 after the ideal focal point are not
very accurate descriptions of what happens in real life. It may be
close to being true at great distances but as the focal point gets
closer it becomes more like ¼ and for really close things like
our target could be 1/5. I was very glad to find this out because it
was making me crazy trying to be true to the myth. What you want to
know is that the center of your focus is the sharpest at the correct
spot and that focus will more rapidly deteriorate on the close end.
This myth has caused many people in past to believe that they have a
back focus situation including the author of a very popular camera
forum. See a more detailed discussion in the FAQ section. Also read
about “What if my sensor does not align with the focus box I see in my
viewfinder.”
If you are someone that
wants to manually focus the camera, you may
want to repeat the test again for ten repetitions with the auto focus
switch turned off. If this fails to give you consistent results, it may
or may not be the fault of the camera. We will discuss that in Part 2
or you can just forget about manual focus for a while.
If you are not satisfied
with the focus at this time go to Part 2.
I have not suggested testing wide angle lenses for two reasons. 1) Wide
angle lenses have such a long depth of field that sweet spot focusing
is hardly neccessary. 2) The nature of wide angle photography is
that detail is not the purpose of the picture and is very hard to
evaluate considering the distortion caused by maintaining a square
image. See Part 4 of this series for explanations of hyperfocal
distance. It is my belief that you should not try to autofocus wide
angle lenses. They work best when focused at intermediate distances in
most cased. There are exceptions of course, the goofy shots taken right
into a person's nose calls for autofocus.
Part
1: Is there something wrong with my camera?
Part
2: My camera is OK. Is there something wrong with my technique?
Part
3: My camera needs adjusting. Can I do it myself?
Part
4: Frequently asked questions and What if?
Part 5: Advanced
focus and lens analysis
Other references on focus procedures:
http://www.dpreview.com/reviews/nikond70/page19.asp
http://focustestchart.com
http://www.digitalsecrets.net/secrets/NikonD70.html
http://www.digitalsecrets.net
http://www.bythom.com
Thanks to Tim Jackson,
Phil Askey, Peter Inova and Thom Hogan for
educating me with their fine publications. Please visit their sites
listed above and help support their work.
|
|