|
Frequently
asked questions and What if?
This
Web site has several parts
Part
1: Is there something wrong with my camera?
Part
2: My camera is OK. Is there something wrong with my technique?
Part
3: My camera needs adjusting. Can I do it myself?
Part
4: Frequently asked questions and What if?
Part 5: Advanced
focus and lens analysis
FAQ
on focus and exposure
What
is depth of field?
What
is Hyper focal distance?
What
do I need to know about wide
angle lenses?
What
does 100% crop mean?
How is the best way to use
AE-L/AF-L button?
The D70 Manual is
very confusing about AE-L/AF-L button. Translation, Please.
How do I prevent droopy
eyes in
flash pictures?
How
Do I focus or meter on something that is not in the center of the
picture?
How do I Trap Focus?
What
is depth of field?
Depth of field
(DOF) is a term which refers to the areas of the photograph both in
front and behind the main focus point which remain "sharp" (in focus).
Depth of field is affected by the aperture, subject distance, focal
length, and film or sensor format.
A larger aperture
(smaller f-number, e.g. f/2) has a shallow depth of field. Anything
behind or in front of the main focus point will appear blurred. A
smaller aperture (larger f-number, e.g. f/11) has a greater depth of
field. Objects within a certain range behind or in front of the main
focus point will appear sharp.
The front and back range
of the depth of field are not symmetrical. the area behind the focal
point is more than twice the distance as before the focal point. This
is only a rough approximation. A great deal has to do with the focal
length of the lens, the angle and distance of the camera above the
ground. The ratio could be almost 5 to 1 in the worst case of using a
wide lens on a table top.
Wide angle lenses have
greater depth of field than long telephoto lenses.
To compute the depth of
field and hyper focal distance, use the following calculator at this
link.
http://www.nikonians.org/html/resources/guides/dof/hyperfocal2.html
Download your own
program to print hyper focal distance charts for your camera at this
location:
 http://www.dofmaster.com/download_chart.html http://www.dofmaster.com/download_chart.html
The circle of confusion
dimension is .020 mm for a 1.5 crop factor DSLR such as a Nikon D70 or
D100.
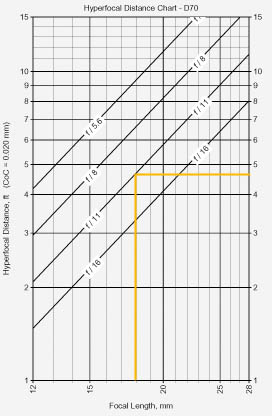
What
is Hyper focal distance?
Hyper focal
distance is the distance you must focus a lens to achieve acceptable
focus from infinity (the horizon) to the forward most acceptable
distance which is usually quoted along with the hyper focal distance.
It is the practical application of depth of field associated with
landscape photography. Wide angle lenses at small apertures have the
greatest range of acceptable focus. If you know the hyper focal
distance the range of the forward focal depth is one half that
distance.
The chart on the right shows that the Kit lens at 18 mm has a hyper
focal distance of 4 feet, 9 inches at f11. When focused at that
distance, everything from 2 feet, 4.5 inches to infinity will be in
focus. That means if you kneel down and include flowers and grass
within reaching distance your entire picture will be in focus. It is
even more impressive to think of what you can do with a 12 mm lens. A
12 mm lens is capable of a sharp image from one foot to infinity at
f11, the sweetest spot on the lens. On a normal clear day the
shutter speed will be more than adequate for hand holding. The forward
focal point is easily computed as half of the hyper focal distance.
What do I need to
know about wide
angle lenses?
Because of
the depth of field and favorable hyper focal distance of a wide lens,
you should never use auto focus unless you use focus lock on a closer
object than the horizon. As you learned from the previous two FAQs,
most of the usable focus range is behind the focus point and there is
nothing behind infinity. Many wide angle lenses will have some marking
on the focus barrel indicating f5.6, f8 and/or f11 on each side of the
focus scribe marks. These marks can be used as a reminder to set the
hyper focal distance in the field. By aligning the correct mark with
infinity you are assured the greatest range of sharpness.
You may be greatly
disappointed when viewing a 100% crop of a wide angle lens because of
the fuzziness of familiar objects which will be much, much smaller in
the picture. Reserve your judgment until you can see a print at the
size you will use the picture. The method for determining acceptable
focus is computed on a technical assumption about the size of the print
and the smallest object resolvable. This term is called “Circles of
Confusion”. Since this is a simplified explanation, I will not attempt
to explain those terms which can be found on the web using Google.
You can prevent a lot of
distortion in buildings and interior rooms by leveling the camera and
cropping appropriately. Some very wide angle lenses are
“fish-eye” and will curve straight lines. They can be linearized with
software editors. Those lenses that are already linearized by design
will still distort rectangular shapes if taken at an angle. If you are
hand holding inside a room and you want the room to look normal be
aware of the vertical lines at either side of the viewfinder and tip
the camera up and down until the lines are parallel with the edge of
the frame.
There will be instances
when shooting exterior buildings when you are standing at the base and
cannot get all the building included except by tilting the camera
upwards. These can be corrected by transform functions within some
photo editors such as Photoshop. You should not try to completely
remove all geometric distortions because some perspective distortion is
expected when it is obvious you are standing at the foot of a tall
building. You can however improve perspective to give the suggestion
that you were standing much further back to take the picture.
What
does 100% crop mean?
It is a term used to
describe a screen image whose pixel dimensions are the same as the
camera dimensions (1:1) On a 19 inch diagonal screen at 1024x768
presentation, it would be like viewing a 40 inch wide print. It is the
most critical way to view a digital image. Some people complain that
their picture does not look sharp straight out of the camera judged by
seeing a 100% crop. Seeing the picture printed at 10x15 inches would be
a better method for judging the quality of the image. Your judgment of
a 100% crop must be tempered by your understanding of the size of the
whole image in relationship to what you see on the screen.
How is the best way to use
AE-L/AF-L button?
The AE-L/AF-L
button can be used for many purposes. Consider these situations.
- Prefocus automatically before
manual focus.
- Focus on an object that is not
centered in the viewfinder.
- Meter on an object that is not centered
in the viewfinder.
- Save the pre flash value to take
pictures of people who blink a lot.
- Trigger a camera automatically to
photograph an animal at a feeder or a runner at the finish line.
This button has evolved
over many years and has existed before the Digital SLR. The history
starts with the introduction of the two stage shutter release button
which was introduced to save battery power when the solar cell was
replaced by a more sensitive battery operated photo cell. A half press
of the button energized the light meter and also computed the exposure
for the aperture adjustment and/or the shutter mechanism. Then came
auto-focus cameras and the half press had more functions. As metering
became more complex by the introduction of multiple photocells and
multiple auto-focus sensors camera engineers devised the AE-L/AF-L
button to allow more creative flexibility for the photographer. AE-L =
Auto Exposure Lock and AF-L = Auto Focus Lock. Now, there are multiple
exposure options and multiple focus options combined with the two stage
shutter button. This is complicated by the fact that the camera may be
moved for artistic reasons after exposure or focus takes place. The
binary possibilities grow from 4 to 8 to 16 ….
Fortunately a menu
system began to evolve for defining how the camera should operate and
what button does what. Now comes a new twist. The Digital SLR must
issue a pre-flash to measure the absorption of the scene for automatic
flash adjustment (iTTL metering). For simple flash configurations it is
only one fast pulse and then the mirror can come up and the shutter can
open. But for commander mode which is used for operating remote flashes
units in “Through the Lens metering” there may be 4 or more pre-flashes
to communicate back and forth between the camera and remote flashes.
Some people actually blink fast enough that this is a major drawback
for this lighting system. Wouldn’t it be nice if you could pre-flash
the scene and automatically set the exposure for all subsequent flashes
thereby eliminating the half closed eyes of the rapid blinkers? Well,
you can, just change one menu pick to create that condition.
Here is where you have
to understand that the AE-L/AF-L button cannot be used for Flash Lock
and regular exposure and focus lock at the same time. You have to
choose between these features.
See the next few
questions to learn how to use your AE-L/AF-L button.
The D70 Manual is
very confusing about AE-L/AF-L button. Translation, Please.
Before looking at the
table consider these terms. Lock means that the exposure value or the
focus condition has been satisfied and should not change unless there
is a condition mentioned. Hold means that the button does not need to
be kept depressed and that a subsequent press of the button will
release the hold/lock. In other words, it toggles on and off. When
exposure
is locked you will see “EL” in the lower left of the view finder.
The E meter turns on
with power on or the shutter is half depressed or the AE-L/AF-L button
has
been pressed. The meter will turn off when the timer for auto turnoff
has clocked down. If you plan on using a hold or toggle option you
should set the meter for a longer time. The meter uses more power than
the camera at rest. When power is off, the battery will last almost a
month. With the camera in standby with the display panel active (power
on) the battery will last about 18 days. Meter, monitor display and
flash use considerably more power than the standby condition. The
battery charge will last a year outside of the camera.
CS
#2 Autofocus
|
Description |
Interpretation (everything
depends on being in Auto Focus.) |
AF-S
|
Single
Servo AF Focus locks when in focus indicator appears in viewfinder,
photographs can only be taken when camera is in focus. AF-S is
displayed in control panel.
|
This
is default for every mode but Sports.
Very important to know that this mode will not allow the shutter to
fire unless green in focus indicator is showing in viewfinder. The
half press shutter function can be transferred to
the AE-L/AF-L
button. |
AF-C
|
Continuous
Servo AF Camera focuses continuously while shutter release button is
pressed halfway. Photographs can be taken even when the camera is not
in focus. AF-C
is displayed in control panel. |
This is the only mode
permitted in Sports mode. Very
important to know that this mode will allow the shutter to fire even
when green indicator is not showing in the viewfinder. (Not true using
the D50) The
half press shutter function can be transferred to
the AE-L/AF-L
button. |
| CS
#15 AE-L/AF-L |
Description |
Interpretation |
AE/AF Lock
(default) |
Both
focus and exposure lock while the AE-L/AF-L button is pressed. |
You
must keep it depressed while operating the shutter button. No value is
saved when the button is released. The EL indicator will be on when
active. The exposure meter will not time out if you continue to hold
this button. |
| AE
Lock Only |
Exposure
locks while the AE-L/AF-L button is pressed. Focus is unaffected.
|
Same
as above, except focus works normally on half shutter button. |
| AF
Lock Only |
Focus
locks while the AE-L/AF-L button is pressed. Exposure is unaffected |
Half
press and release shutter button to focus. Then press and hold the
AE-L/AF-L button to hold focus. Half press the shutter button again to
get new exposure value and focus will stay as it was until the shutter
is released. The EL indicator will be on when active. |
| AE
Lock Hold |
Exposure
locks while the AE-L/AF-L button is pressed and remains locked until
button is depressed again or exposure meter turns off. |
Press
and release the AE-L/AF-L button. Exposure will be computed and held
until the button is depressed again or until the meter time runs out.
Multiple shots may be made on the same meter reading but eventually the
timer runs out. You should set a long timer for this mode. Your long
choices are 16 seconds and 30 minutes. The EL indicator will be on when
active. |
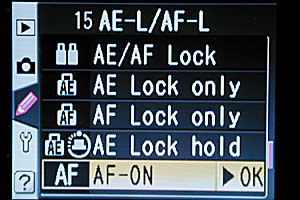
| AF
On |
Camera
focuses when AE-L/AF-L button is pressed. Camera does not focus when
shutter release button is pressed halfway. |
The
camera focuses when the AE-L/AF-L button is depressed.
In AF-C mode the camera will continue to adjust focus until you release
the button or the shutter is fired. The shutter will fire even though
the focus lamp is not lit. (Not so with the D50)
In the AF-S focus mode the camera will focus when shutter is half
pressed. If the camera is moved so as to be out of focus and the
shutter is pressed all the way, nothing will happen until some object
comes into the focus path. Then the shutter will fire. This is known as
a trap shutter and can be used to photograph an animal at a feeder or a
runner at the finish line.
|
FV Lock
|
Flash
level locks when the AE-L/AF-L button is pressed and remains locked
until button is pressed again or exposure meter turns off.
|
Camera
should be in any mode that permits flash (not scenic mode). Menu Item
#19 FLASH MODE should be TTL or Commander mode. Press the AE-L/AF-L
button. The flash will fire but the shutter does not fire. “EL” appears
in the lower left of the viewfinder indicating the flash value has been
sent to the remote SBx00 or the onboard TTL flash system. Press the
shutter button. There will be only one flash fired after the mirror is
up. Continue to use the flash as long as the “EL” indicator is showing.
Flash level locks when the AE-L/AF-L button is pressed and remains
locked until button is pressed again or exposure meter times out. |
CS #16 AE Lock
|
Description |
Interpretation |
AE-L
button
(default)
|
Exposure
can only be locked by pressing
the AE-L/AF-L
button. |
Exposure
will be computed by the half press of the shutter button unless the
the AE-L/AF-L
button is being pressed or is holding a previously locked value.
|
+Release
bttn
|
Exposure
can be locked by pressing AE-L/AF-L
button or by pressing shutter-release button.
|
+Release
should be interpreted as "or" release. CAUTION - If CS #15 is set to
the defalult setting of AE-L/AE-F Lock and the AE-L/AF-L
button is depressed the camera will not focus with the half shutter
release. The correct focus has to be achieved before the AE-L/AF-L
button is pressed. This is not the case when the AE
Lock Hold is set. The focus will take place at the half press.
|
How do I prevent droopy eyes in
flash pictures?
Droopy or blinked eyes
are sometimes caused by the pre-flash that takes place when using TTL
metering. It can be eliminated by executing the pre-flash in advance of
the actual capture of the image.
The following is for a
Nikon D70 however other cameras may be adjusted the same way
using a different menu item number.
Camera should be in any
mode that permits flash (not scenic mode). Menu Item #19 FLASH MODE
should be TTL or Commander mode.
Menu #15 AE-L/AF-L
Select FV- On
Ready the flash unit by
mounting the SBx00 or popping up the onboard flash and/or selecting the
flash symbol.
Frame the picture in the
viewfinder and depress the AE-L/AF-L button. The flash will fire but
the shutter will not move. The symbol “EL” will appear on the bottom
left side of the viewfinder indicating that the pre-flash has been
executed and the exposure value is locked for the next shot.
Shoot as many pictures
as you need with this setting until the situations changes and you need
to compute a new value. To return to normal mode, press the AE-L/AF-L
button again and the “EL” indicator will turn off. At this point the
pre-flashes will occur when the shutter is depressed. Repeat the
previous step for a new scene.
By using this method you
can prevent many blinkie pictures. You cannot, however completely
eliminate blinks and so you should take as many additional pictures as
you need to make sure everybody in the picture has their eyes open. In
a very bad situation you could clone open eyes from one picture to
another to have a complete group of open eyes.
Here is where we have to
understand that the AE-L/AF-L button cannot be used for Flash Lock and
regular exposure and focus lock at the same time. You have to choose
between these features.
How
Do I focus or meter on something that is not in the center of the
picture?
In part two of
this
series we discussed the two different focus modes which were AF-S
(Single Servo) and AF-C (Continuous Servo) Which is Custom Setting #2
on the
D70. This method relies on the AF-S mode starting the focus at the
beginning of the
shutter button movement with the object of interest already framed by
the center focus brackets. When focus is achieved, then the camera is
moved to re-frame the shot with the focus locked by holding the shutter
button at the half point. The AF-S (single servo) mode has already
satisfied the requirement for focus. The green focus indicator in the
viewfinder
stays on even though the sensor no longer sees a focused image at the
center, thus allowing the shutter to be fired. See Part 2 of this
series for a pictoral explanation.
The alternate way to do this is to use CS #15 AF ON and CS #2 AF-C.
This allows you to focus with the AE-L/AF-L button until you decide you want to stop
changing the focus and let up on the AE-L/AF-L button. The focus
remains locked (stays the same) until you press the shutter release
button. Exposure will depend on what the camera sees when the shutter
releases.
Trap
Focus
 Use the same CS #15 AF ON as above
but change the CS #2 to AF-S. Use
the AE-L/AF-L button to set the focus
point on an animal feeder or finish line at a race. It is best to use a
tripod since moving the camera around can trip the trap. Move the
camera off the focus area and press the shutter release all the way
down. Nothing happens. When an animal or any moving object comes into
the focus sensor range and registers as being in focus the shutter will
trip. This will work because of the rule that AF-S mode will not allow
the shutter to release until focus is achieved. Use the same CS #15 AF ON as above
but change the CS #2 to AF-S. Use
the AE-L/AF-L button to set the focus
point on an animal feeder or finish line at a race. It is best to use a
tripod since moving the camera around can trip the trap. Move the
camera off the focus area and press the shutter release all the way
down. Nothing happens. When an animal or any moving object comes into
the focus sensor range and registers as being in focus the shutter will
trip. This will work because of the rule that AF-S mode will not allow
the shutter to release until focus is achieved.
The AF-C mode continues
to try to adjust the focus up to the time the shutter fires and will in
fact fire even if focus is not detected. (This is not true with the
D50, focus must be detected). This last fact is something
that will come into play as we move the focus control to the AE-L/AF-L
button.
Part
1: Is there something wrong with my camera?
Part
2: My camera is OK. Is there something wrong with my technique?
Part
3: My camera needs adjusting. Can I do it myself?
Part
4: Frequently asked questions and What if?
Part 5: Advanced
focus and lens analysis
Other
references on focus procedures:
http://www.dpreview.com/reviews/nikond70/page19.asp
http://focustestchart.com
http://www.digitalsecrets.net/secrets/NikonD70.html
http://www.digitalsecrets.net
http://www.bythom.com
Thanks to Tim Jackson, Phil Askey, Peter Inova and Thom Hogan for
educating me with their fine publications. Please visit their sites
listed above and help support their work.
|
|