

|
|
|
|
| |
This
Web site has several parts Part 1: Is there something wrong with my camera? Part 2: My camera is OK. Is there something wrong with my technique? Part 3: My camera needs adjusting. Can I do it myself? Part 4: Frequently asked questions and What if? Part 5: Advanced focus and lens analysis My camera needs adjusting. Can I do it myself? How does the focus system work? Some History: The buggy whip manufacturers were not willing to admit that there was a decreasing market for their product when the horseless carriage became popular. So it is with cameras. Some things will be done differently as the technology improves. Ansel Adams is dead, now. We don’t need the black cloth and the eye loupe and the ground glass to focus our large box cameras. We don’t need chemicals and enlargers and infinite patience to make fine images. Here is what the last ten years have given us and the buggy whips we no longer need. Not so many years ago detailed images were made at 1/80 of a second at f11 in bright sunlight with Verachrome black and white film. That same picture can be taken in color at 1/1000 of a second at f11 with the D70. Early SLR cameras had split image prisms in the viewfinder that could provide perfectly focused images if you remembered to use it. We now have auto-focus, auto-speed, auto-aperture and auto-ASA as well as auto-color balance. Camera manufacturers have decided that the benefits of a multi sensor autofocus system with active LCD indicators cannot be combined with prisms whose surface is not flat with the plane of focus. So, the ground glass and focus aids have gone the way of the buggy whip and the black cloth. When you look through the viewfinder you see the active sensor display and a very clear image to compose with. The photographer used to look at the ground glass with a magnifying glass. Now, he looks through the lens directly at the subject and the viewfinder lens and the lens of his eye all combine to make an image on the retina and macula and in the brain, BUT, the eyeball is a variable focus device and will accommodate a range of focus. So with this optical path there is no guarantee that what you see is also recorded on the CCD. This process used to be called a virtual or aerial image, both of these words have new meanings today. Focus devices have been modularized to the point that manufactures may use a particular module for several years in more than one camera. We do not know exactly how they work because the methods used are trade secrets and competitors don’t like to share even with customers. We can tell approximately how they work by observing how they behave. The module for the Nikon D70 is a Nikon 5-area, TTL phase detection, Multi-CAM900 autofocus module, first used in the N80 film camera and later in the D100 DSLR. Focus sensors like high contrast and lots of sharp edges better than flat, smooth surfaces. If the sensor sees an image that is almost in focus, it knows which way to go to get in focus. The camera starts to find focus when the shutter button is half depressed. In AF-S mode the search for focus stops as soon as it has found focus. In AF-C mode the search for focus continues and if the subject is moving to or from the camera it will continue to try to stay focused. Also if the camera moves to something that is a different distance than the first focus it will try to lock onto the new area. The center focus sensor is the most powerful because it is shaped like a plus sign that is wider than it is tall. It can see vertical, horizontal and diagonal lines and find focus very easily while the other sensors can only see lines and detail that cross the line. The rectangular boxes on the viewfinder show only approximately where the sensors are. How the mirrors influence focus Pictured below is a drawing showing the light paths uses in manual and auto focus. The green path (A) represents the photographers view through the diopter lens, matte LCD, reflection of the VF mirror and ultimately the interchangeable lens and subject. The line at the center of the lens is reference point (O) which is the same for all lenses and all light path measurements. At the time the picture is captured the mirrors are lifted into a horizontal position and block the view of the photographer to the subject. When the exposure is completed the mirrors return to their spring loaded position resting on the elliptical mirror stops, 1 and 2. The important thing to know is that the distance to A and the distance to B needs to be exactly the same for the photographer to obtain an accurate focus. It is also important that the lens between the photographer's eye and the transparent Matte LCD is perfectly focused. 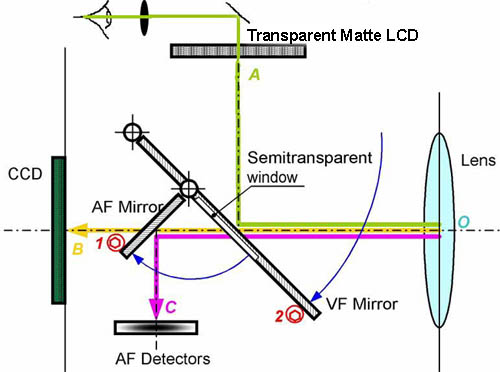 Mirror stop 2 is used to change the distance of light path A to calibrate manual focus. It also moves the image up and down on the viewfinder. The fundamental design of the camera should cause the position to be correct when proper focus is adjusted. The large VF mirror reflects only part of the light to the eye. The other part of the light passes through the mirror and is reflected off the AF mirror onto the CAM900 module. This is a full reflective mirror that is spring loaded to rest on the adjustment stop #1. This is path C and should be adjusted to be the same length as path B (and thus A) Adjusting this stop for proper focus will also move the light path so that the sensor will be offset to the image of the matte LCD seen by the photographer. You can conclude that if the sensor does not appear to align with the focus rectangle then it is also likely to focus incorrectly. 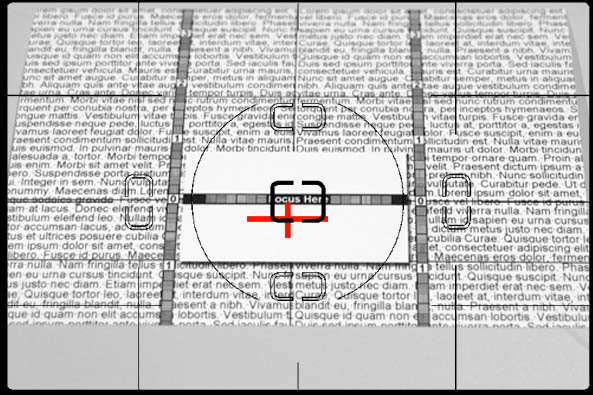 Tim Jackson and I had discussions about where automatic focus was located in relationship to the target used. He convinced me of one truth. In an empty field with only one object to focus on, the sensor would focus the whole image on being able to see any contrast with any part of the sensor, even with the smallest part of the sensor as seen in the picture above. The red cross represents the shape and size of the sensor which you cannot see. You can however tease the sensor and cause it to snap into focus from either an empty frame or from a busy frame. In an empty frame the sensor will lock focus when any part is touched by a contrasting target. In a busy frame as seen below the sensor must have a predominant percentage of the sensor active to lock in. Note that the center image ignored the fact that the vertical bar in the cross could see an out of focus picture element. When the wooden stick became about 80% of the sensor coverage the focus snapped onto the stick. In radar and rocket science terms the bar in the empty frame was "acquired" and the stick in the busy frame was stolen. In the real world of photography, most images are in a busy environment and so the focus area is represented by the center of the cross as an average of readings. For testing purposes we need to lock on the target area of the image, no matter what.  When we get through with adjusting the automatic focus you want to tease the sensor as in the picture above to know where the sensor is when you lock on a bird on a limb far away. As I mentioned before, if the focus is done properly the sensor will wind up closer to the vertical center. The horizontal center is not adjustable by the user. My particular camera has about 50% of the sensor hanging out the left side of my focus rectangle. I will remember this when I have a bird on a limb. The picture below represents the position of my sensor after adjustment. 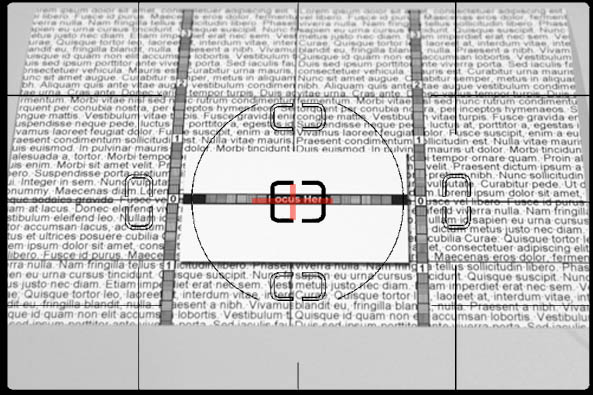 . .What should I do? You can send it back to the store or the manufacturer and have them fix it. If the camera is still in warranty it will cost you nothing. It will cost you time and effort and you have to be able to prove your point. Depending on your location it may be 2 to 6 weeks to get it repaired. It is up to you at this point. I am going to describe what I did to correct the problem I had. In the beginning, I made mistakes and didn't understand all the relationships of how to go about adjustment. I had the suggestions of Sergei Khizhiy of Moscow, Russia on what he did and the nice illustration of the mirrors but I had no faith in my ability to focus because I had never done it successfully and my eyes had cataracts which made it more difficult. I followed Sergei's advice and successfully adjusted the auto focus mirror stop and there it stayed until long after I had the lenses in my eye replaced. I am 70 now. I published a web page with my findings and a number of people successfully fixed their own back focus problem and thanked me for helping. It was becoming obvious to me that some people could actually focus a D70 manually and actually preferred to do so in certain situations. I started to go over all my information and study the additional information I had collected. I had some contact with Wally OZ, a former contributor to dpreview and I contacted Tim Jackson who had also published a web site and focus target. Tim and I had different approaches on how to test. After some discussions I concluded that I had made some errors and some discoveries. I redesigned my website and focus targets based on my changes in attitudes. I understand Tim Jackson is working on a rewrite of his as well. I suggest you take a look at his site. He is listed on each of my pages. Go see Tim, but come back. I want to make adjustments Getting ready You will need to set up and procure the following: A tripod, you can do without if you are very dexterous. A 2mm hex wrench, long handle if possible Sufficient light to see into the mirror box with the camera mounted on the tripod. A steady hand. Avoid the extra coffee. A clean place to work Cellophane tape Strong reading glasses if you need them A notepad and pencil The steps Test manual focus and adjust as needed. Test auto focus and adjust as needed Repeat both tests Map the position of the sensor using blank field method Try other lenses and compromise if necessary Enjoy your camera Detailed steps Take a picture as described in part 1 and make a note including the frame number and some comment on how far off the focus is after doing the Move. Because the adjustment is a circular cam, it may go up or down with any movement. Start adjusting clockwise and make note of how far you moved the wrench each time. Each facet of the hex wrench represents 60 degrees. You only have 60 degrees of freedom on the back cam before you have to reset the wrench in the hole for another stroke. 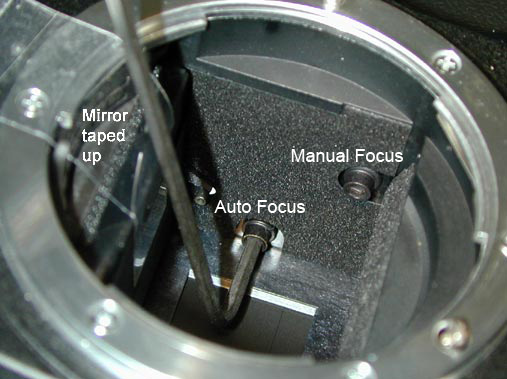 Caution: Do not touch the mirror surface. There is only 60 degrees of motion available on the auto focus cam with the wrench engaged. When the wrench is engaged it will stay by itself. You will have to move the wrench all the way to the to the limits of the lens mount before you can insert it into the new position for more movement. If you have tested your camera's focus and found that your manual focus is consistent and on target you may proceed to the auto focus section. Select a lens you are going to use the most and if possible set it to about f4 for testing. If your focal length can be set to 50 to 100 mm use the pocket target. If the lens is longer use the big target and put it on the floor instead of a table if you cannot get closer than 2 feet. Manual Focus Photograph the target as described in Part 1 several times and note the frame numbers from the viewing screen and where the sweet spot is on the scale at the side of the image. Remove the lens and carefully tape the mirror up. Engage the wrench in the manual cam and note the angle on your pad. Turn the cam clockwise about 10 degrees and note the new position on your pad. Untape the mirror and save the tape. Install the lens and manually focus three more times. Evaluate your results and determine if your focus has improved. If it has not changed or improved, repeat adjustments until you are satisfied. If the focus result is worse, you need to turn the cam counter clockwise 20 degrees and proceed to test making adjustments counter clockwise in 10 degree increments. Remember to take notes. You may be interrupted or distracted and lose track of what you have done. Autofocus Adjustment Switch the camera to AF-S and engage the Autofocus switch on the camera body. Repeat the steps used in manual focus except make adjustments with the rear cam near the image sensor. Upon completion of adjustment, check the sensor position using the busy field method and note the new position, both vertically and horizontally. Commit this to memory for future use. You will need this information for focusing on a small object in a busy field. Busy field method of mapping focus sensor Using the upper half of the pocket target, focus on the crossed lines above the normal focus target line. Using a slender stick like a meat skewer or wooden match with marks on it, hold the stick about an inch above the target and photograph the stick in various positions relative to the horizontal line. The stick will steal the focus from the busy matrix of characters at one or more points. You will be able to observe in the viewfinder when this takes place so you relate it to the focus rectangle. Note the difference between picture 2 and 3. The camera selected an imaginary place between the target and the stick in picture 3 because the sensor could see both of them and averaged the results to create a resting point. This is the difference between a busy and sparse field for focusing. In a sparse field the sensor will lock on even the smallest object that is within the sensor's view. 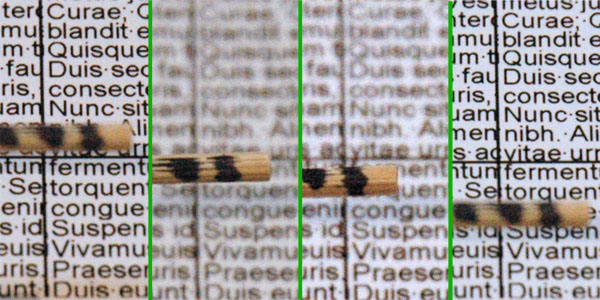 Completion Do a quick check and confirm that all your lenses perform acceptably. You may find that your longest lens or your widest aperture lens leaves something to be desired. Remember that some lenses shift focus when used at widest aperture and that all focus tests were conducted with the eye or auto view being at full aperture. The reason for being at f4 was to normalize a depth of field that would be compatible with the markings on the target you used. If you must compromise between the performance of many lenses, you are the best judge based on how you use your camera. Do not be over anxious about depth of field ratios. The rule of thumb about the foreground depth of field being less than the background depth of field is just that, an approximation to help manage your expectations. It is not exact and depends on a subjective and somewhat flawed evaluation process. It is now time to enjoy your camera. Download the test charts Because these are bit mapped images, they contain pure white and pure black spaces and lend themselves to very efficient compression as TIFF files using ZIP. The uncompressed TIFF file should be easily loaded into any of the newer image processors from Nikon, Canon or Adobe. Print them as is. Do NOT sharpen or resize the targets or you will alter the ability to hold resolution at the high end. Click to download Targets Part 1: Is there something wrong with my camera? Part 2: My camera is OK. Is there something wrong with my technique? Part 3: My camera needs adjusting. Can I do it myself? Part 4: Frequently asked questions and What if? Part 5: Advanced focus and lens analysis Other references on focus procedures: http://www.dpreview.com/reviews/nikond70/page19.asp http://focustestchart.com http://www.digitalsecrets.net/secrets/NikonD70.html http://www.digitalsecrets.net http://www.bythom.com Thanks to Tim Jackson, Phil Askey, Peter Inova and Thom Hogan for educating me with their fine publications. Please visit their sites listed above and help support their work. |
|
| |
My Photo Gallery
My
Home Page |