|
Part
2:
My camera is OK. Is there something wrong with my technique?
This
Web site has several parts
Part
1: Is there something wrong with my camera?
Part
2: My camera is OK. Is there something wrong with my technique?
Part
3: My camera needs adjusting. Can I do it myself?
Part
4: Frequently asked questions and What if?
Part 5: Advanced
focus and lens analysis
Part
2: My camera is
OK. Is there something wrong with my technique?
My
Camera
seems to focus correctly sometime but not always.
If
you are
reading this now, you have probably entertained the idea
that you might be doing something wrong. I will try to be as diplomatic
as I can. Not knowing whether you are a newcomer to photography or a
more experienced consumer camera user I will start with fundamentals.
Be
patient, you may already know many of the things I am going to suggest.
I
am going
to rank this as the number one cause of bad focus for
beginners. It is in every camera manual I have ever seen. “My people
pictures are fuzzy.”

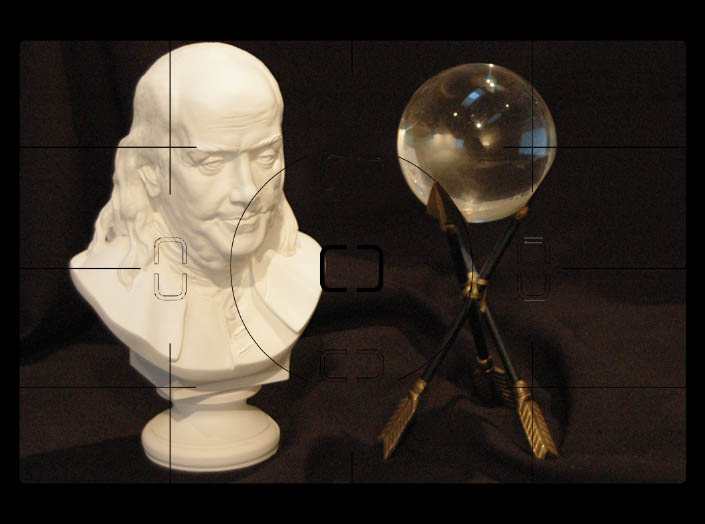
The
point
and shoot camera was handed to someone else and they just
looked into the viewfinder, saw two people and pressed the button. The
picture is in focus at the very center where the trees are but the
people are out of focus. Some new point and shoot cameras have a
special mode for taking pictures of two people. This same thing can
happen to people who are learning about composition and are trying to
apply the rule of thirds which places the point of interest off center.
You
have
been instructed about getting a clear picture of the pocket
target but the same technique will not work for real life conditions as
mentioned above. The solution is simple but it needs to become
automatic with every shot you take from here on out. The name I give
this procedure is: “Focus and Frame” Digital film is cheap and you can
check yourself immediately using “The Move”. I would suggest you do
this at least 50 times to get the feel of how automatic it becomes.
Focus
and
Frame
Your
camera must be in AF-S mode. If your camera has no AF-S mode it
most likely already behaves like it does. In AF-S mode, when the
shutter button is half depressed the focus is locked on the active
sensor. DSLR cameras have multiple sensors and I recommend that you use
only the center sensor. On the D70 camera there is a sliding switch
just to the right of the viewing screen with a dot and an “L”. When in
the L position the sensor selected will stay selected and not try to
find another subject.
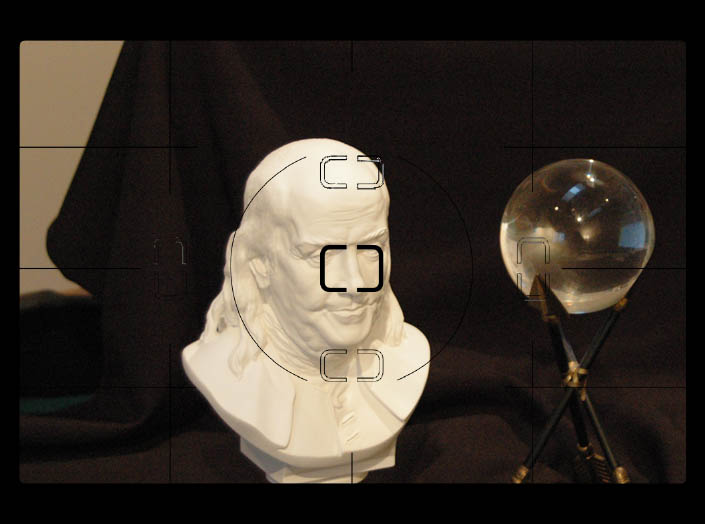
1 Set your
zoom distance or position yourself to frame the picture you
want to take. See it properly framed in the viewfinder.
2 Without
moving or rotating your body, twist the camera in your hand
so that the focus sensor rectangle is on the closest eye or principle
point of focus for the picture.
3
Gently
depress the shutter release button half way until you see (and
hear) that object focus.
4
Return the camera angle to the original framed composition while
still holding the shutter button half way down.
5
Depress
the button fully and wait for the image to return in the
viewfinder.
That
is
it, “Focus and Frame”. You must become aware of when you focus
and hold it until the picture is taken. If you let up your finger at
any time before the picture is taken you will lose the focus reference.
Sometimes
children are moving rapidly and you may have to tap the
shutter button and re-focus as the distance changes. The alternative is
to use AF-C which will continuously correct the focus while holding the
half position and you will have to crop away part of the picture to
establish a desirable composition. This means you have to keep moving
the camera to keep the focus sensor on the subject.
Flowers
and Insects
You may be practicing Focus and Frame on flowers and insects, but not
all your pictures are keepers. What is happening? You may already know
that using a wide aperture makes a more attractive picture because you
can control which items are more in focus due to short depth of field.
Be aware of wind and how easily an object can go in and out of focus.
Related to that is how well grounded you are when taking pictures of
things near the ground. The time between focus and shoot should be
short to preclude that fact that you are taking a breath or correcting
your balance while squatting. I found myself swaying forward a great
deal while photographing honey bees from a half squatting position.
Which brings up the next subject.
Use
a tripod
Almost any photography teacher is going to recommend using a tripod to
increase your percentage of keepers. There are several ways this will
help you.
1
The
clumsiness of handling the tripod will make you think more about
your composition before you set up.
2
You are less likely to move the camera during the exposure. Camera
movement ranks high on the bad picture list.
3
You will take a little more time to level your camera and consider
your exposure before shooting.
4
You can manually focus or auto focus and then turn off auto focus if
the scene is not changing.
Why
is manual focus so difficult?
Because auto focus is so easy. Trite but true. Cameras all used to be
focused manually. In order to make things easy the manufacturers added
features to the SLR viewing screens to objectify correct focus. The
most popular item was the split image view finder followed by the
micro-prism focus aid. In the split image finder the focus screen had
an area in the middle of the screen that had a wedge shaped prism
facing left on the top side of the prism and facing right on the bottom
side of the prism. If you looked at a vertical line through that part
of the viewfinder you would see a slightly offset segment of the line
when you were out of focus and a continuous line when focus was
correct.
The micro prism finder worked the same way but there were little
pyramid prisms in the center circle which broke up the image into small
parts unless it was perfectly focussed. The third choice was a gritty
texture in a center circle of the viewfinder to give a reference
surface to the image you were viewing through the lens. Not all cameras
shared the image between the viewer and the film. There were also range
finder cameras that used a series of offset prisms to triangulate two
views and adjust the focus distance appropriately. It was very
difficult to have a variety of different lenses for this type of camera.
What
we
have now is a slightly textured screen holding liquid crystal
display elements to remind us of where the focus and exposure sensors
are on
the image. It is not possible to have a split image finder because of
the electrical connections within the matte glass.
 In the days of
Ansel Adams the photographer had a ground
glass plate which represented the film plane when a film slide was
inserted in the camera. He used an eye loupe that could be adjusted to
see the texture of the ground glass. First he would adjust the lens of
the eye loupe so he could see the texture of the rough side of the
glass. Then he would adjust the lens of the camera until the image on
the ground glass was sharp. Why ground glass? Because he was looking at
two things at the same time, the image produced by the camera lens and
the reference surface of the front of the glass. If the glass was
missing or clear he would be looking through the camera lens and his
loupe lens and the lens of his eyeball and the image would exist on the
back side of his eyeball perfectly focussed. This would be a virtual
image as if you were using a telescope. In the days of
Ansel Adams the photographer had a ground
glass plate which represented the film plane when a film slide was
inserted in the camera. He used an eye loupe that could be adjusted to
see the texture of the ground glass. First he would adjust the lens of
the eye loupe so he could see the texture of the rough side of the
glass. Then he would adjust the lens of the camera until the image on
the ground glass was sharp. Why ground glass? Because he was looking at
two things at the same time, the image produced by the camera lens and
the reference surface of the front of the glass. If the glass was
missing or clear he would be looking through the camera lens and his
loupe lens and the lens of his eyeball and the image would exist on the
back side of his eyeball perfectly focussed. This would be a virtual
image as if you were using a telescope.
In an SLR camera there is
another lens we have not mentioned. It is the first lens you see
looking through the eyepiece. It is the diopter corrector and is used
to allow people with corrected vision to adjust for their differences,
with and without glasses. This is the most important lens you have to
worry about when doing a manual focus. You have to make sure this is
the easiest image to see when your eyeball lens is at rest. Here is
where the old man has an advantage on the young man. As the eyeball
ages the lens becomes less compliant and able to shift focus. Bifocal
glasses are used to accommodate near and far distances. The young man
looks through the viewfinder and sees two images superimposed and
focuses on the far image outside the camera. The image looks sharp to
him but the reference plane representing the image sensor in the camera
is out of focus. It is like looking through a dirty window. Yes, you
can see the scene outside and the window disappears. If you look at the
dirt on the window, the scene goes blurry. The old man's image needs a
corrective lens either on the camera or as corrective vision lenses to
see at one distance only.
To
successfully do a manual focus you first have to adjust the diopter
correction on the camera to your “prescription” so that the easiest
thing to see is the matte glass and markings in the viewfinder.
1
Decide
on whether you are going to use your corrective glasses or
not. Many people can go either way, but you should be consistent.
2 Make sure the camera lens is totally out of focus. Set the focus to
infinity and point the camera to a close object.
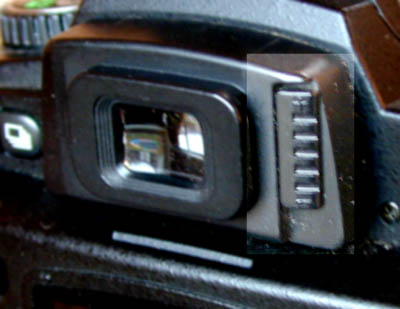
 3 You may have
never seen this adjustment because the eye cup hid it from you. This is
shown with the eye cup off. Move the eyepiece diopter adjustment until
the markings on the
viewfinder are crisp and clear when your eyes are staring out in space
or relaxed. The book always reminds you not to insert your finger in
your eye. 3 You may have
never seen this adjustment because the eye cup hid it from you. This is
shown with the eye cup off. Move the eyepiece diopter adjustment until
the markings on the
viewfinder are crisp and clear when your eyes are staring out in space
or relaxed. The book always reminds you not to insert your finger in
your eye.
4 Look again and try to see the texture of the matte glass. Remember
the image outside the camera should be completely out of focus so as
not to distract you. If you cannot adjust the focus for your eye you
can buy the proper corrective lens for stronger prescriptions. Your
camera dealer or Internet camera supplier can provide these. For right
now use whatever corrective lens you have. The range of focus is: Top
of range=distance corrected, bottom of range=mild reading glasses.
5 You are now ready to try to focus on something. Use the pocket target
and try to see the geometric patterns on the “Focus Here” line. Rock
the focus back and forth to get an appreciation for what it looks like
when perfectly focussed.
6 Now try on a typical target with some texture like a plush animal toy.
7 Put “The Move” on it to evaluate on the spot or take the picture to
your computer to check.
It
complicates matters if more than one person will be manual focussing
a camera. Theoretically all the users could use driving glasses and
they could use the same setting. Anyone with more than a small amount
of astigmatism (cylinder) in their prescription should use the camera
with their eyeglasses on.
What
do I do about kids sports and active pictures?
Good question. You have one of the ultimate tools at your beck and
call. There are pros and cons to each tool. Lets look at the choices.
1 High ISO values. Allows higher shutter speeds and smaller apertures
which are more forgiving for marginally focused subjects and depth of
field required to capture some near and far subjects at the same time.
Forget about noise related to high ISO values. noise is far less
objectionable than out of focus pictures.
2 Powerful flash such as SB800 for Nikon cameras. Good for in the gym
or outside in the sun. It will double your available light outdoors or
even better in the gym. The increase in light allows you to control
shadows, stop action, avoid camera shake and reduce aperture for
increased tolerance to focus error.
3 Use AF-C mode. For action coming toward you it will increase your
success rate over AF-S. You should shoot at wider angles to leave image
space to crop for composition. Your subject should be at the center of
the viewfinder at the time of the shot. Focus and Frame will not work
here unless you can predict where the action will be. Warning, in AF-C
mode the shutter will fire even if the camera is not focussed. The book
says to check for the focus indicator in the lower left corner of the
viewfinder, but with so much going on, this
could be impossible. You take your chances and may have some OOF (out
of focus) pictures to deal with.
4 Single area focus is my personal choice. The shutter is locked until
focus is found in auto focus. Manual focus will fire anytime.
5 Dynamic area focus. User selects focus area manually however if the
subject starts moving the other focus sensors become the active focus
area and are so indicated on the view screen, This may work for some
situations but be prepared by taking a lot more pictures and discard
the misses. If you are trying to track your child in a field of others,
only you know which is your child, don’t let the camera decide.
6 Closest subject mode. This mode does not necessarily start at the
center sensor and will test all sensors to choose the closest. The
closest may be the grass on the ground or a fallen child. The scary
part of this one is that it is used as the default in most of the
preset modes such as
Auto, Portrait, Landscape, Sports and night shots. Even scarier, there
is no indication of which focus sensor is active. So, beware of using
automatic and preset modes if your focus area is not plain vanilla.
This is the least desirable in my estimation and many photographers
besides me agree. Almost all photographers would encourage you to get
familiar with the M, A,S, and P modes of your camera as soon as you
can. Only in those four modes do you have complete control of which
focus mode you want to use.
Click to download
Targets
Part
1: Is there something wrong with my camera?
Part
2: My camera is OK. Is there something wrong with my technique?
Part
3: My camera needs adjusting. Can I do it myself?
Part
4: Frequently asked questions and What if?
Part 5: Advanced
focus and lens analysis
Other
references on focus procedures:
http://www.dpreview.com/reviews/nikond70/page19.asp
http://focustestchart.com
http://www.digitalsecrets.net/secrets/NikonD70.html
http://www.digitalsecrets.net
http://www.bythom.com
Thanks to Tim Jackson, Phil Askey, Peter Inova and Thom Hogan for
educating me with their fine publications. Please visit their sites
listed above and help support their work.
|
|


