| Creating and
installing custom curves...lotsa gotchas..
|
| |
Before you use the utility, you have to know the rules and gotchas. Rule 1 Each new picture control must be
based on a copy of
the original controls in the camera. You may not delete any of
the original controls. You may make copies of the D2Xx Controls which
are suplied for D300 downloads but the D90 will not recognize them if
you try to load them into a D90. There are a few controls in my
download library that may be loadable into a D300, but not a D90.
Custom controls may be made using the D2X curves, but are only usable
in NikonView when unpacking a NEF file.
Rule 2 The contrast thingie will be supplied by one of three mutually exclusive sources: a) Any D-Lighting control set in the camera will over ride contrast in the current PC (picture control). b) Any standard PC or copy of a PC with a limited range of changes in contrast and brightness trim as set up by the user. c)
A
curve designed in the PC Utility and exported as a PICCONxx.NCP file.
This file
may be internally named in the utility and that name will be carried
into the
Camera PC bank and appear on the camera menu under Set Picture Control.
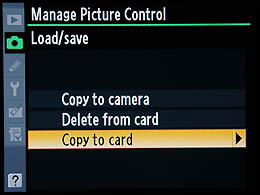
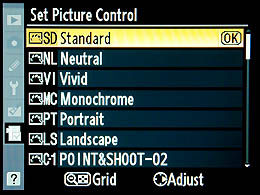
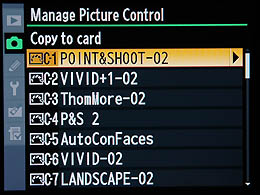
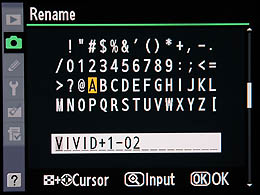
The picture control containing the curve or digital settings will will have the name PICCONxx.NCP and has no descriptive information in the name other than the two digits. The name can only be seen when importing to the camera or the PC utility. If you have a hex editor you could see the name imbedded in the file along with an encrypted hex digit indicating the source curve for the camera. When the file is on the Secure Digital chip, you have no idea what is is other than the two digit number. This is one of the gotcha points of confusion. You EXPORT, not download or save to the Compact Flash or secure Digital Card. You can supply your own name either in the utility or after you get it into your PC bank in the camera. Google hexedit to find a free hex editor if that interests you. When writing to the CF card the utility
will create a nested
folder of NIKON/CUSTOMPC/ which contains the NCP files. Even after
loading the
PC to your camera you can fine tune the sharpening, saturation and hue
settings. CAUTION! Use a dedicated memory card,
usually discarded from another camera purchase and too small for
practical use. Format it first in the camera and never format it again
unless you have back up files stored on your computer. You will lose
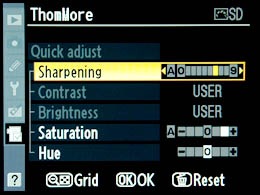
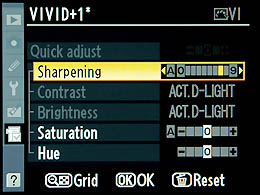
your Picture Controls if you format this card again in the camera. You may have hundreds of variations and can see by looking at your PC settings which of the above contrast options are in effect. You will either see: Contrast and Brightness values as a bar chart or, The words USER grayed out for the values if you have a custom curve or, The
words
ACT.D-LIGHT grayed out.
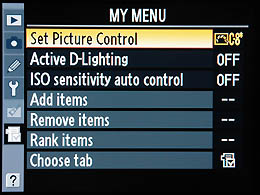
In order to get to picture controls
rapidly, make SET
PICTURE CONTROLS the first item in you’re MY MENU selection and program
your
assign function button to “Access top item in MY MENU”.
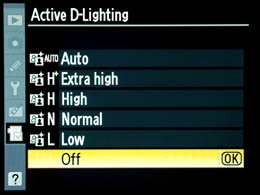
I set the second item in MY MENU to “Active D-Lighting” The third item is Set ISO (auto – on or off) With that setup I can do all my
exposure setups with one
hand and very few button presses. The next chapter will help you
design your Custom Curves. In another chapter I will explain how
Active D-Lighting works and show how
it differs from contrast in Picture Controls.
|
|
|||||||||||||||||||
|
Chapters: 1 History of curves and programmable contrast and gamma 2 Picture Control and Picture Control Utility 3 Creating and installing Custom curves in the camera 4 How to design a curve for your needs 6 D-Lighting applied after the shot 7 Where to go for more information © Leon Goodman 2009 |
|
 The curve itself may be saved using a descriptive
external name having the extension of ".ntc". The picture at the right
shows both curve files and Picture Control files in the directory
structure required for transport. You can tell by the size of a Picture
Control file whether it has a curve embedded or not.
The curve itself may be saved using a descriptive
external name having the extension of ".ntc". The picture at the right
shows both curve files and Picture Control files in the directory
structure required for transport. You can tell by the size of a Picture
Control file whether it has a curve embedded or not.