| D-Lighting
applied after the shot......and other solutions.....
|
| |
If the picture is still in the camera, but
you have no chance to re shoot it at the correct exposure you still
have
one more opportunity to change it before it goes to the printer or the
computer. The D80 and D90 have and additional step for post processing
built into the camera which is in the retouch menu. Even though you
have used Auto Active D-Lighting to capture the picture, there is one
more chance to salvage shadow information in the camera. An overexposed
picture cannot be saved, but a manual D-Lighting process may be applied
to any picture to enhance shadow detail and may be applied only one
time. It will create an additional JPG image with the first three
characters of "CSC" instead of "DSC". You are allowed a choice of three
different degrees of adjustment. Hopefully, by now, you have a JPG that has
the tonality you can live with. All the 14 and 16 bit math has been
done and you don't have any more gross adjustments to the image except
cropping and sharpening for the next step, printer or web. But, if not,
you can forget about the previous six chapters and start over again
with raw conversion. You have two choices, use Nikon View which
is free and accepts the preset conditions within the NEF file or
Capture NX2 which costs $150 discounted or you could take your NEF file
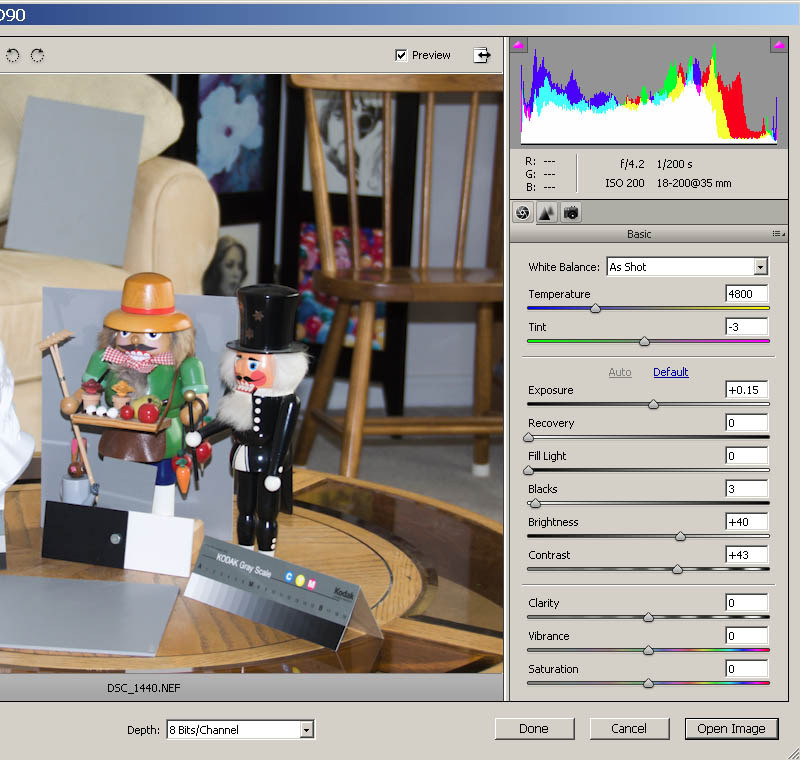
to a third party software such as Adobe ACR. While you were in Nikon ViewNX you might
have noticed that the exposure, white balance, highlight protection,
contrast, shadow protection and other adjustments could have been made
in addition to Picture Controls could have been used to create a new
JPG version in addition to any already converted by the camera. You
could have even saved the intermediate version as an eight or sixteen
bit TIFF file for further processing. Had you decided to use the purchased version
of Nikon CaptureNX2 you could have continued to selectively enhanced
areas of the picture using proprietary masking systems to make more
artistic enhancements to sky, water and any definable area you desired.
This is a legitimate option and many people prefer this. When you leave the realm of Nikon software
you give up all the special features that make your camera unique.
There is no more in camera features such as gamma curves, vivid
conversions, Picture Controls, etc. Although there are many non Nikon
solutions for post processing, the most popular and well known options
for raw processing are Adobe Camera Raw which is available for both the
professional Photoshop and the inexpensive Photoshop Elements products.
The most inexpensive ACR solution is to purchase Elements and download
the appropriate ACR add on for free. The cost is about $80 discounted. At this time ACR does not recognize the
variables assigned by the camera to process the image but instead uses
a best guess curve to the raw image. This is why ACR has frequent
updates to include the most recent cameras and best guess estimates of
what will produce an acceptable image. ACR for the D90 will only work
with the most recent versions of Adobe products. Currently there is an
ACR for Elements 5-7 and Photoshop CS3. If you have another camera
check the Adobe site for ACR availability. If the file opened in Photoshop is a raw
(NEF) file, ACR will open with a window for the image and a single
column of variables that should be used for the conversion to an
editable file for Photoshop. The list of tasks is equivalent to a
wizard in as much as it should be filled out from top to bottom and
certain settings are remembered from image to image as you work through
your list of images. 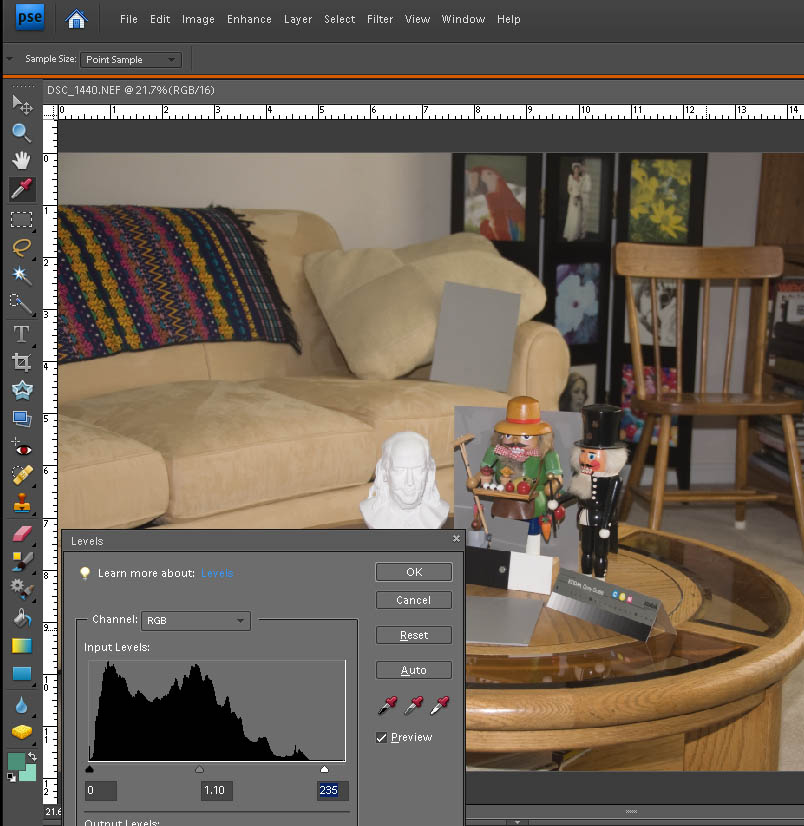 The other adjustment you may find helpful is the Shadow highlight feature which allows you to adjust the shadow and highlight area as separate adjustments. Adobe has made a game of finding the feature under a variety of different menu structures. It is in every product, so be a good sport and find it in whatever product you may have. One thing they have done right is to do the math in 16 bit mode whether or not you have used 8 or 16 bit when importing the image. This means more accurate rounding and fewer gaps and peaks in the histogram. This is not true of the levels adjustment which can create posterized gaps in the dark tones. Remember that the histograms you see in black do not weigh the red channel as heavily as the other color channels and so you may still blow the red channel unless you particularly watch that channel. Just to be clear, if you produced a properly exposed JPG out of the camera the levels and shadow/highlight features mentioned here are still an effective way to tune your image.
|
|
||||
|
Chapters: 1 History of curves and programmable contrast and gamma 2 Picture Control and Picture Control Utility 3 Creating and installing Custom curves in the camera 4 How to design a curve for your needs 6 D-Lighting applied after the shot 7 Where
to go for
more information © Leon Goodman 2009 |
|